Engine Mounts Done

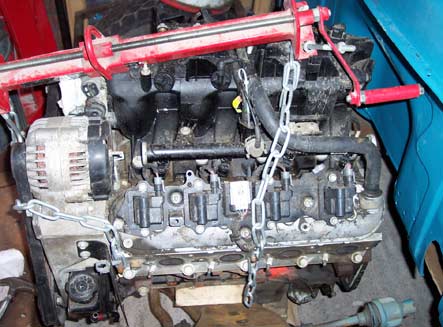
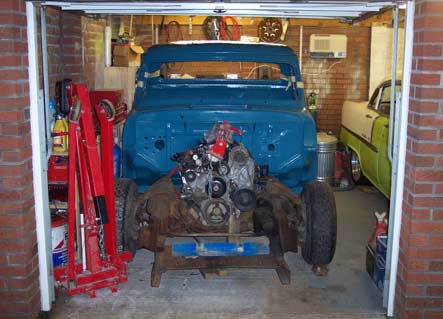
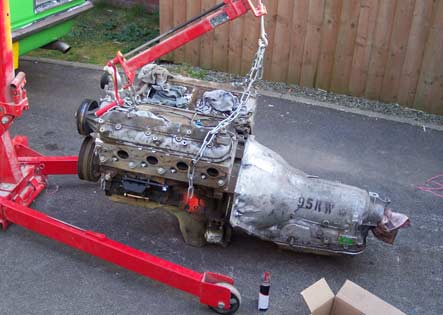
I wanted to get the engine mounted properly and work out how much of the firewall needed removing to get it to fit. I decided to just cut a big square out of it and re-make it later as the existing bulge was too far down to use. I have a spare 4L60-E with a snapped off tailshaft housing so I bolted that on to the block to hold the back of the engine up when it’s on proper mounts. With that done, I hung it roughly in position on the crane and started measuring. With the tailshaft dead centre between the rails, the engine looked visually off centre and I just could not get it to sit right.

Motor-and-Box.jpg

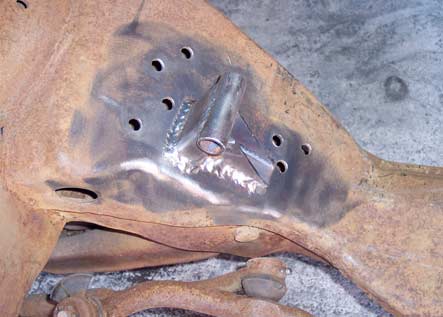
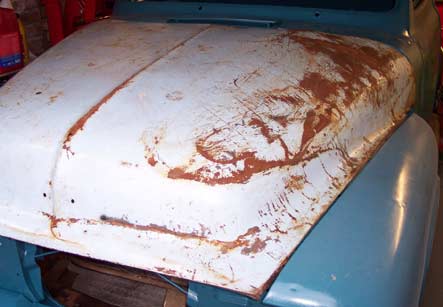
I ended up with it sat as close as I could without cutting the sump or crossmember, and cut pieces of box section and some tube to fit. I dropped it onto the new mounts, checked everything again and after a bit of shaping was happy. I scraped around the edges so that I could put them back in the same place and lifted it back off the mounts. With some supports welded on, I dropped it back into position then tacked them in place. Next day the engine came back out, and I welded them in all the way around. I also realised that it looked so bad visually as the core support crossmember was way out of line. It was nearly an inch out horizontally and vertically, so I cut off the one side and carefully lined it all back up before welding it in again. The motor then went back in and all the front sheetmetal on and I was done for the day. At worst I may have to slot the core support holes to get it all to fit, but at least its straight now.

Engine-Mount.jpg

More Hammering

I spent last weekend working on the hood again, and got the crossmember out so that I could repair the dents and the crossmember itself. It was pretty much beyond repairing nicely as it was crushed and snapped so I hammered and bent it to as close to correct as I could and tacked it back together. I think I’ll end up having to make a new one but it’ll do for now. I also got the worst of the dents out on the drivers side. The front lip was buckled and split so I got it back as best I could with a prybar and lump hammer. At that point I called it quits for the weekend.

Hood Getting Better

The plan for this weekend was to try and get the edges straight so that it would fit before I carried on with the dents. The hood edge is pretty much dead straight where it meets the wings, so I clamped a piece of box section to it as a guide and set about it with the hammers. With it striaght I could see how bad the front edge was, about an inch too high and the inner crossmember was bent that much too. That took a lot of hammering, clamping and levering to get it back where it should be. I tacked it all up and test fitted it and it looks pretty good so far. Still needs plenty of work, but getting there.

Hood Edge

Half a Gearbox

I re-flashed the computer last week and fired it up to test the computer. It ran rough, and when I plugged in the laptop it showed an injector circuit fault. I’ve had exactly the same fault before when a fuse went on the Camaro, so I got all the fuses out one by one and tested them but none were gone. I had the dash back off again and checked the plugs were seated into the computer properly, still the same problem. After a load more checking and double checking I found a loose injector plug. What a pain in the ass. With the dash back in again, and no faults showing, I took it round the block for a test drive. The brakes were poor, so I took it easy. On the industrial estate at the back of the house it got a long enough run to shift up to 3rd, or it would have if it didnt slip and go nowhere when it came out of 2nd.

Trans-Plug.jpg

On Saturday I had a big tidy up and put all my tools in the new toolbox I got off ebay. It’s on wheels, so Tommy had to do a few laps of the house sat on top of it first. It’s nice to have everything in one place for the first time. On Sunday I got the car up on stands to get at the gearbox wiring, and tested the 2-3 shift solenoid circuit wires. Nothing wrong, so I put the extra pin in the plug for the PWM clutch while I was in there, plugged it all back in and tested it again. Sadly it’s exactly the same, so I guess it’s a gearbox rebuild coming up. While I was under there I also put the padded P clips on the battery cable and called it quits.

new-box.jpg

The Hood Lives to Fight Another Day

I had a few more hours working on the truck on Saturday, and spent the time on the roof again. I wanted to try and get a small area of it as smooth as I could so I can tell if I’m going in the right direction. I spent ages gently hammering with a planishing hammer and it seems to be getting smoother. It will need a lot more to finish but I’m hoping to get away with as little filler as possible rather than hiding it.

Tommo.jpg

I also wanted to get the hood out of the shed and back on out of the way. I had made a start on a lot of the really bad dents but had been told that it was beyond economic repair to do it properly. I’d had no luck finding a replacement as yet, so I laid it down on the garage floor and had another go at it to see if I thought I could do it myself. After a lot more bending and hammering I think I can fix it myself. There are only two really bad parts left on it now, both of which are behind the crossmembers. The plan is to pull them out and get the hood back into shape then repair the crossmembers. It sits pretty well now, and I have so much space around the engine it’s ridiculous.

Hood-round-two.jpg

Making a Start

The last of the panels for the truck were on the drive when I got home the other day, so I had everything but the hood shoved in the garage (that had to go in the shed for now). After discovering the gearbox was dead on the ’55 on Saturday I decided to do some work on the truck instead on sunday. I hung the front wings and the majority of the front loosely so that I can still push it in and out and it’s out of the way as the roof is now well and truly full of truck panels. I had two front valance panels, one was full of holes and the other was bent like a banana. I got the worst of the dents out so I could use it for now and bolted it up.

Front Hung

I decided to make a start on some of the bodywork, and the doors had been bugging me. They were a completely different shape to the openings at the back, and I wanted to work out if I could fix it in the door or if I’d have to re-do the chop. After making a few slices with a hacksaw I had enough movement to pull it in so I’ll weld that up when I can get the ’55 out of the way. With that done I felt like doing some more hammering, so made a start on the roof. It was really badly warped where it had been chopped, and had about an inch of filler in it when I fist got the truck. I spent a few hours with the hammer and dollies and got it loads better. It needs a few days work or so I reckon to get it good enough, so that’s something to look forward to.

Roof Started

Truck Comes Home

With the garage cleaned out to make space for it to live in, I got the truck dropped back home. I had the new engine sat on a stand so needed to sit it between the rails temporarily on some wooden blocks to make space for the truck. With the motor being a truck motor it has a very deep pan which I wanted to keep if possible. It also made it a pain to get over the rail and into the firewall recess, but after a lot of messing about in the rain it dropped in. The adapter plates were miles away from the Camaro mounts so I decided to dump them and make new mounts to go onto the plates. After a lot of messing about trying to get the old mounts off I got the grinder out and chopped the bolts off and shoved some wood blocks in to hold it still for now.

Engine-in-For-Now.jpg

It needs to come back a few inches as you can see in the pic, but I plan to take the manifold off, get a box on there and set the angle before I worry too much about the firewall recess. The truck manifold is ugly as sin, but a swap to a LS1/LS6 manifold means new accessories which I’d like to avoid. I did think of using an Edelbrock Victor Jr manifold with an elbow for the throttle body but I’d rather spend the money on forged pistons and rods than a manifold that wont gain me anything over what I have. I’m hoping to make a start on cutting the factory loom down in the evenings so I’m ready to go with that when I’m out of things to do on the ’55. Sadly that’s got to the point where it needs lots of things bought for it rather than lots of work so it’s slowed down a bit. It’ll be out and about soon tho, can’t wait.

Tucked-in-Safe.jpg

Computer Mk II

The Camaro got a new engine and trans a few weeks back, and the PCM needed to be re-flashed for the later trans. Unfortunately the extension that the laptop was plugged into wasn’t switched on and I ended up with a blank PCM when the battery went on the laptop. The camaro was at Zannetec so the ’55 had to give up it’s PCM to get it moving. I ordered another one from the US and some new flash chips to fix the dead one and waited patiently. The truck was also coming home from having it’s body blasted so the garage needed a massive tidy up which I did the next weekend.

PCM-is-missing.jpg

With enough space to get the truck in it wasn’t so easy to work on the ’55. After a bit more tidying up and moving round I could move the truck out and have more space than I did a few weeks back. The PCM turned up this week, so out went the truck and I set about re-fitting it. I decided to turn it the other way up to give me more clearance on the wiper drive, and ground the fins off so that it would fit tighter to the dash. A new clamp on the top and I put it all back together again. I couldn’t test fire it as Tommy was asleep so I wired up the stereo while I waited. With that done and Tommy up I turned the key, the fuel pump whirred and nothing happened. The starter circuit wasn’t working. I decided to re-do it from scratch as I wasn’t happy with how it was done. After a few hours of messing I had one less relay and was ready to go. A turn of the key and it fired right up. It needs the ’55’s tune stuck on there now and I’m back where I was a few weeks ago.

Tight-Squeeze.jpg

New Engine

I’d bought a complete Camaro LT1 and 4L60-E off ebay a few years ago and planned to freshen it and replace the Impala one. I got Zane to strip and check it and he found no problems so I ordered up a full set of gaskets and a beefier cam and he rebuilt it ready to swap in. While he had the car I got him to make a new exhaust system for it in stainless and subframe connectors to stiffen the car up. The new exhaust gave me loads more clearance so I can now get over at least some speed bumps.

Subframe Connectors

The engine runs well but one of the lifters is sticking so it’ll need the intake off it and fresh ones stuck in. It also doesn’t like to idle so low with the new cam so I had to bump the idle up slightly, and wire a park-neutral-park switch in to stop the car stalling as it goes into gear. The ’95 box also needs an extra wire to control the torque converter lockup so it’s running unlocked all the time for now. It’s nice just driving it again instead of the Volvo I got as a spare while the work was getting done.

The Maro

And Now, Wipers

I got wiper blades this week and a quick check showed they didn’t fit the arms that I had. After a bit of grinding down to size I fitted them but didn’t tighten them fully just in case the sweep was wrong. I flipped them outwards as well and switched them on to check. There was a horrble crunch as the passenger side arm hit the body and popped off leaving a nice little gouge in the paint. Another check with the arm off and the wiper was running backwards on that side. I guessed the Rain Gear wiper transmission must have dropped down when I was fitting it and I hadn’t noticed.

WipersOn.jpg

With the clock out on the passenger side, I found that the arm was indeed upside down. I loosened it up and flipped it the right way round before putting it back together. A quick check of the wipers (this time with rags under them just in case) and it was working as it should. I took them back off again and ran some tubing for the washers before putting it all back together nice and tight. The messing about with the wipers had moved the vent hoses and the wipers now hit them. After a load more messing about I had the hoses and the engine computer far enough away that they shouldn’t cause any hassle. At that point Tommy came out looking for me and wanted to beep the horn of the car. After about twenty goes I was concerned for my neighbours and my sanity, so disconnected the battery and called it a day. Just as well as he tried to turn the keys when the horn didn’t work any more.

TommosDriving.jpg

Starting to Collect Parts

I’ve been keeping an eye out for the various bits I need for the F100 and with the engine plans one of those is a decent strong axle. I found a 12 bolt axle with hardened shafts and C clip eliminators that was a few inches narrower than the one under there which suited me perfectly. I’d bought a 12 bolt posi to replace the one in the Camaro only to find it was a 10 bolt under there so it’s sat in the box ever since. I also had a bearing and seal kit spare so just a few more bits and I should have a nice strong axle.

12-bolt.jpg

I’d also been looking for a pair of turbos for the motor. My plan was to get a cheap pair initially and step up to some decent ones once it was all up and running. Well that was the plan anyway. I spotted a pair of brand new water and oil cooled Garretts for sale on eurodragster from the same guy I’d bought the 144 supercharged engine for the ’55 from. I gave him a ring and they turned out to be hige, way bigger than I’d planned to use, but after a bit of bartering we came up with a price I couldn’t say no to. The majority of the boost will end up going to waste initially but I will have massive potential with this setup and some serious bottom end work on the motor. There goes the idea of doing it all sensibly.

BigTurbo.jpg