Steering Column In

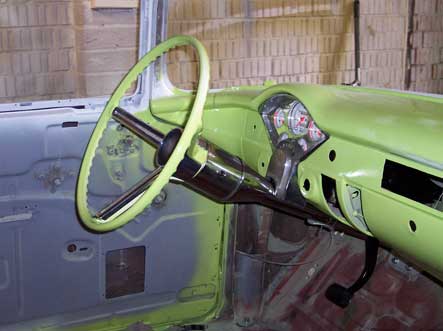
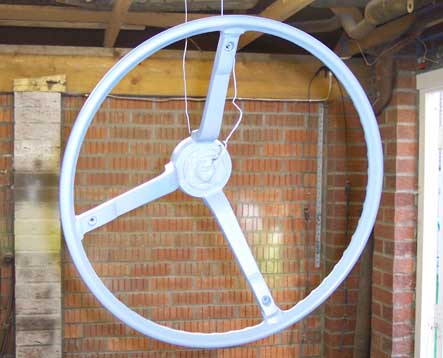
I only had a couple of hours to work on the car today, so made the most of it. Poppy wanted to help me as well, so she came out and vacced the car and kept me company. I’d painted the brake pedal assembly with Hammerite last night, so hung that in place and fitted the booster. Poppy thought the pin in the booster was like a worm when it moved, so I had to press the pedal about 100 times while she laughed at it. Poppy got bored then and went in, so I put the column together. I put the swivel from the floor mount on, then roughly put it in place.

Boost-and-UJs.jpg

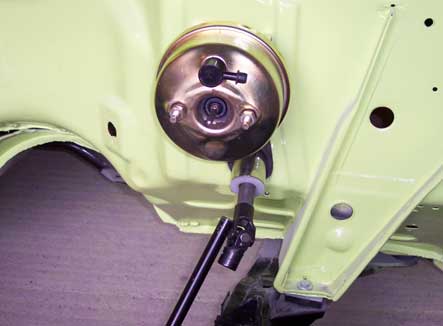
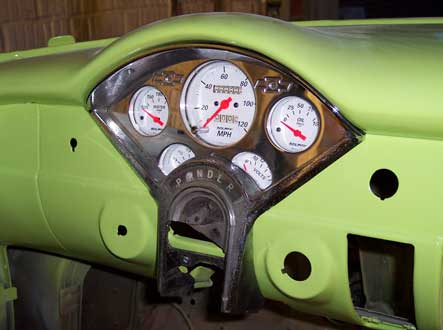
I’m missing the bracket from the bottom of the dash that holds the column, and when I got the car the old column was held in with wire. I hung the column in place with some wire again, then put the wheel on to get the position for the rest of the steering. Looks cool with it in, and I could test fitr the UJ’s on the end of the column and the rack to see how much I needed to cut off the connecting rod and left that for another day. Back in the house to carve pumpkins ready for Halloween tomorrow.

Column-and-wheel.jpg

Other doors done too

The weather was a bit iffy today, and I wanted to get the other doors done and sort the boot springs. I wheeled it outside and propped up the boot with a broom to have a look at the springs. They need to be hooked in on one side and then twisted to hook into the other. It’s quite hard to do if you have a broom in the middle of the boot with you, but I got it done with no real drama.I lined the boot up as best I could, but it’s way too high on one corner so I’ll have to have a look at it. With that done I made a start on fitting the seals on the doors.

Boot-Lid-Bad-Fit.jpg

I got about half way round one of the doors before it started to rain. Wheeled it back in and it immediately stopped. Back out and got them both done before cleaning up the locks. It started to rain again, so back in again for half an hour while I polished the handles up as well, then back out to finish putting it together. Apart from re-hanging the drivers door as I wasnt happy with the fit it was pretty uneventful. Nice to have all the doors opening and closing, makes it feel a bit closer to being on the road.

panel-fit.jpg

Side Trim Fitting

I carried on with the assembly this weekend, the plan was to do the dash paint and then crack on with the trim. I needed to paint the ashtray too which I was convinced I’d primed. When I dug it out i had cleaned it up but not painted it. I decided to leave it until I paint the other bits that need doing rather than mix up 3 types of pain just for that. I dug through the box of bits that came with the car looking for the bottom half of the steering column clamp with no luck, Looks like I have mice tho judging by the half eaten carrier bag in there.

More-Shiny-Bits.jpg

I cracked on with the trim then. There are about a million clips to put on, and you have to guess which ones go where on each piece.The long spear on the rear quarter was a nightmare to do as the clip spring snapped and the clip spun. I had to lie on my back and undo it with one hand in between the tyre and the body and the other stopping it from spinning. With that done I re-set the door latches to close properly and made a start on the window trim. Starting to look like a car rather than a project now. Feel good about it all.

Gaps.jpg

More bits fitted

I got a load of bits through from the US on Friday, and the house is starting to look more like a parts store than a house. One of the bits that arrived was the rack and pinion steering. I didn’t want to have it sat around for ages, so I pulled the original steering off and bolted it in on Saturday. Apart from convincing myself the ball joints were on the wrong side and swapping them over and then back again it was an easy install. I need to fit the column now to cut the rod to length so I can get the UJ’s in.

New-Rack.jpg

With that done, I decided to stick the chrome V8 emblems on the back of the wings. I wasn’t sure about them, and wanted to see if they looked “right” or not. Still not convinced, but shiny bits are good. I also put the raingear wiper system in, which was an easy install. It tucks up under the dash neatly and leaves the firewall nice and clean. I want to get as much of the under dash stuff in so I can find a position for the LT1’s computer and see how much space I have for the alarm, and stereo bits. The dash needs touching up first tho as it had a massive run on it. Will do that ad shoot the glovebox cover and ashtray at the same time.

Wiper-Motor.jpg

A moment of Clarity

The weather was great on Sunday, so I wheeled the car out to give it a wash and colour sand it. When it was washed it looked great and I felt proud of it. There was plenty of dust in it to sand out tho, so I started blocking it down. There are a few little ripples and marks in the finish, and as I found them I started to get more down about them. I gave it a polish with the mop and compound on the passenger side and it started to rain, so I pushed it back inside and went and had a cup of tea. I felt pretty flat about the paint, but then had a moment when I thought “Why am I doing this?”. It’s a cool car, built by me, and it’s not the best finish in the world, but does it matter?

Trim-going-on.jpg

It’s never going to win a show, but that’s not why I built it. I decided to stop worrying about it and get on with putting it back together. I got a box of bits down from the roof, and fitted the door seal on the front passenger side. Then I dug out the new striker plates, fitted them, then cleaned and oiled the lock mechanism which was filthy but OK. The handle has seen better days, but when I put it on the car it looked amazing. I did the back one as well, and then got the “Bel Air” trim out of the box and polished that up as well and fitted it. What a difference now. For the hell of it, I put the new gauges in to see what they looked like, Feel really positive about it all now.

Dash.jpg

Cleaning the Moldings

With the body all painted, I wanted to get the last few bits and pieces that needed painting done. One of the bits that needed doing was the side moldings which had the inserts painted black. and badly at that. I went and bought a cheap bench grinder, a wire brush and a polishing kit for it, and tidied up a bit to fix it to the workbench.The trim is stainless and it had a tough life before I got it, and is covered in dents and scratches.

Shiny-Bits.jpg

I took the paint off the side spears with the wire wheel, which took ages. I hammered out the dents as best I could, and sanded down the really bad scratches. I gave them a quick clean with a scotchbrite pad, and then started with the polish and the rough mop. After a good few hours I had some much better looking trim, and a million more bits to do. I reckon I’ve got a good few days of polishing to go. I’d started sanding the water pump down a few weeks back, so I polished the bit I’d done as well. It came up fantastic, but I’ve got loads to do, so I think I’ll do it to a new one just in case.

Shiny-Pump.jpg

Wings Painted (Well one anyway)

I painted both of the wings with high build primer last weekend, so this weekend I sanded them down ready to paint.I’d also filled the holes in the valance panel with weld, and I filled and sanded itl ready to paint as well. I shot the valance with etch and high build, then got the wings cleaned up ready to paint them all with white and two coats of green. I got the white on and was just finishing off when a big fly landed in the paint. When I pulled it out of the paint, it left a bad mark, which I tried to fill back in with paint that ran.

Drivers-shiny.jpg

I couldn’t put the green on over the run as it would show as white when I sanded it down, so I tried my best to smooth it out with no luck. In the end I had to leave it till next week to sand out and re-paint. I did one coat of green over the other wing and valance anyway, then left it all to dry for half an hour. Once it was dry enough to move, I packed up for the day, and lay the valance on the front of the chassis. It was then I noticed I’d filled one of the holes for the grill as well, so I’ll need to drill that out before I do the next coat.

Wing-all-shiny.jpg

Bit more painting

I wheeled the car out today and started on the wing again. It still needed more filling after I’d rubbed down what I’d done last week, and there were some areas where it needed hammering down and re-doing completely. It’s hard to see what I’m doing, but I guess that just comes with practice. While the filler was drying, I carried on with the rag joint, and tidied up the garage a bit which was in a right old mess. I also filled and sanded the steering wheel that I got for the car. There were a few small cracks, but nothing major and it should look good painted up.

Wing-etched.jpg

I was not happy with the next load of filling on the wing either, so another skim went on and I started sanding the alloy water pump to see if I wanted to go ahead and polish it. It’s going to be a nightmare to do as it’s such an awkward shape, but I’m sure it will be worth it. I also filled the front valance only to realise the reinforcement that I’d taken off to straighten wasn’t welded back on. I decided to leave that for next time and get some etch primer on the wing, as I was having to sand rust off every time I worked on it, even though it was only a week in the garage. I cleaned it up with panel wipe, and shot the wing and the wheel. It shows the filler patches through the etch, but also showed up some more small problems. At least it wont rust.

Wheel-meat-again.jpg

New Wheels On

I got the new tyres on the Camaro this week, so pulled the rims off the ’55 to swap the old ones from the Camaro on to it. The 275/40/17’s that are on the back of the Camaro fitted on one side but not the other as the body is not on straight yet, and it looks like it will be way too tight to run them on the ’55. I ended up with the fronts from the Camaro on the ’55 and the 18’s on the back with 245/40/18’s on. They look a bit too narrow for my liking, but they were free tyres so I can’t complain.

Big-Rims-Baby.jpg

With all that out of the way, I started on the wing again. A couple of hours more of sandinig and filling and it was time to call it a day. I planned to paint the wing with etch as soon as I can, so I got the column down from the roof to strip down and checked it would fit. The rag joint I had got with the column was the wrong size for the end, so I left it all as it was and closed up the garage. Only managed a few hours on the Sunday, with Poppy helping me sand the wing again, wearing ear defenders and a dust mask. When she got bored, and while some more filler was drying, I splt the rag joint by grinding off the tops of the rivets and then hammered out the centre of the joint which then fitted the shaft on the column. Needs a bit more filing to get it to fit perfectly then I’ll bolt it back together.

Thin-is-in.jpg

Battered Wing

I set about cleaning up the front valance and the other wing today. With the car all painted, I decided to work on the drive as it makes an incredible amount of mess. Valance cleaned up easily, two big dents that had been filled amd a split were the only problems. Both dents came out easily with the hammer and dollies, so not much more work needed on that. The wing turned out to be full of filler, some of which was at least half an inch thick. I ended up using the grinder brush to get it out of the dents.

Battered-Wing.jpg

It looks like it had been dented quite badly in the past, and knocked about with a ball pein hammer. There were also a few big dents on the top and the wing extension was out by about a centimetre at the join with the arch. I spent about two hours getting it all back in shape as best I could, and was pretty pleased with the result. There were still a lot of small dents from where it had been hammered, but at least it was the right shape. I tacked the wing extension in the middle and hammered the front level before tacking it in place. To get the arch to line up I cut a line through it with the cut off wheel, and pulled it back in and welded it up. Some more shaping with the hammer, and then filled it all in with the welder and gound it out before skimming it quickly. Was time to call it a day, but should be able to get it done next time I’m in the garage.

Wing-less-battered.jpg