It’s Painted!

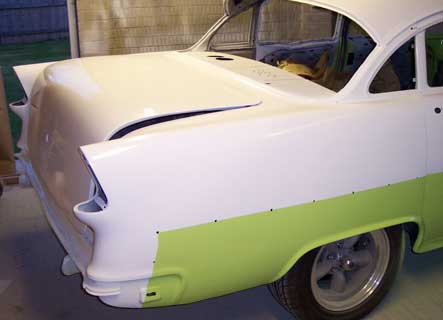
I started painting the green at about 7 o’clock, and that also went without too many issues. Put a bit too much on the dash and got a sag running along the edge, but it’s not the end of the world. An hour later I was all washed up and ready to pull off the masking paper. As it came off I was amazed with how well it had come out for a first go at painting. I took a load of pictures and called it a day. I emailed some of the pics to various people. one of which spotted I’d masked the paint divider wrongly on one side. I wasn’t bothered about doing the job, just that I had to do it again.

Rear-Quarter-Painted.jpg

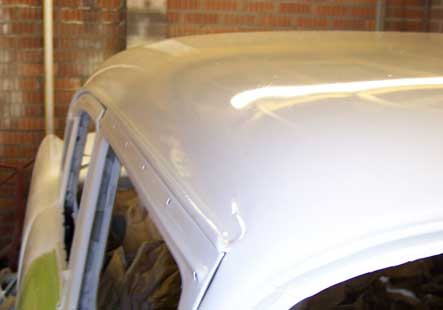
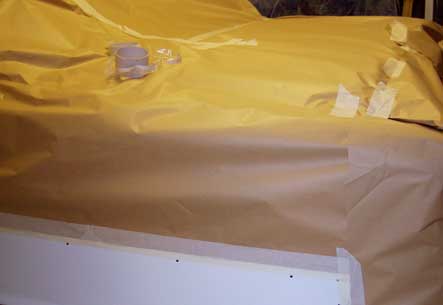
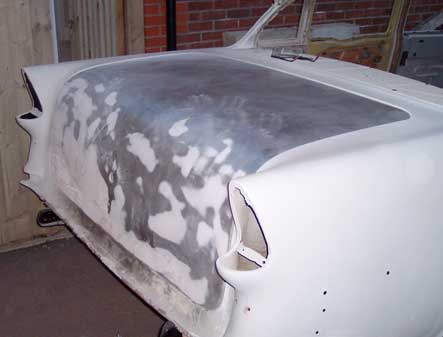
Next day I got on with it and sanded the area down, and masked the car up ready to paint it. It painted easily, and after it was dry, I pushed the car outside to sand out some of the dust in the other panels. The roof looked awful out in the sun, and even after sanding it and polishing it was no good. I’d ended up with two completely different whites, and the roof didnt match the edges where I’d painted it a few monthe back. I wheeled it back into the garage and sanded it all smooth with the DA and masked the entire car up ready to paint the roof and called it a day. Next day I cleaned it all off, gave it two coats and pulled off the masking. To be honest, I did a better job of it this time, so it’s no bad thing really. Quite chuffed with it all now. Just got to put it all back together now.

Roof-Mk3.jpg

Painting for real

I’ve been spending most of my spare time doing bits on the Camaro, so the ’55 had been a bit neglected. With the end of the summer approaching way too rapidly I took some time off work to spend with the family and get the car painted. I finished the filling on the rear valance, re-did a couple of patches on the boot and a scratch I’d put in moving rubbish round in the garage. I was also doing the wing I’d started at the same time, so while one lot of filler was drying, the other was being sanded. The wing had rusted where it had been left in bare metal, so I wanted to get it done in etch primer when I did the valance.

First-Coat.jpg

With a coat of etch on, a few more lumps and bumps became visible. More filling and sanding, then a layer of filler primer and then some stopper and it was ready. I sanded the entire car to prepare it for paint and called it a day. Next day was the big day, and after spending an hour and a half waiting for the paint to be mixed, I was home and ready to go. Another quick clean up, and the firewall and wheels masked, and it was ready for the first coat of white. All went well, and apart from a few marks where I stupidly caught it with the air line or my clothes, was all done. I washed up while I waited for it to flash off. Once it had about an hour to harden, I started to mask it up ready for the green. Another hour later, and it was ready for the next colour.

Who-was-that-masked-panel.jpg

Big Bad Brakes

My Baer brakes arrived this week, along with a load of other bits and bobs for both cars. It had been raining overnight, so wasn’t looking good to work on the car on Saturday. It was still wet, but I decided to get on with it anyway. I pulled the old disc and hub on the driver’s side, then pulled the top and bottom ball joints which were both knackered. With the new ones back in, and the new hubs and discs on it started to rain again. After waiting for ten minutes, it didn’t look any better, so I decided to get on with it anyway. There was a new master cylinder to fit, and new lines to be made so I did that. I came in to look after Tommy for ten minutes or so while Lisa went out, and the weather cleared up a bit. I decided to get the other disc on, which went easily, then re-did the ends of the pipe for the new fitting (the old ones were rusted solid).

Big Bad Dae Brakes

The pipe had gone really brittle, and split when I made the flare. I cut it back a bit more and tried again, which seemed OK. While the wheels were off, I put the new Hotchkis anti roll bar in as well, which apart from being a pain in the arse to get past the new brakes was easy. I called it quits at 10pm which made me popular. Sunday morning I bled the brakes, and the fronts were weeping on the joint of the old pipe. Rather than risk it, I replaced the old pipe with a new one and bled it again. I then did the rears, which had an unbelievable amount of air in. When it was all done, I gently tested it on the drive and it all seemed good. Took it round the block and gave it some stick and changed ends when the rears locked up. I ended up with the rear brakes on minimum and they still lock up first, but the car stops amazingly. The rears are actually doing something now as well. When I tested them before, the fronts had turned blue from heat, and the rears were lukewarm at best. Now they are way too hot to touch, and the fronts are cooler, but still way too hot to touch. Looking forward to driving it to work tomorrow.

New master

Wheels that Fit

Last weekend I was determined to get some more bodywork done, but I had noticed a strong smell of fuel from the Camaro, so had to give that the once over before I got onto the ’55. It was really hot weather, so I only wheeled it out to the edge of the garage so that I could work in the shade. I sanded down the filler primer from the week before, and filled a couple of holes that were in the filler. I also started sanding the bottom edge of the boot by hand. As I sat on the floor working away they said on the radio that it was as hot as the carribean. You’ve either got to love doing this, or be stupid.

18s-a-go-go.jpg

My Torq Thrust II wheels that I bought on ebay arrived this week, so I had a few hours of wheel swapping between the two cars to check what fitted. The new wheels are 18×8 and fit the ’55 with no problem. You wouldn’t believe how happy I am to have nice wheels that actually fit!. I also tried the 17x8s from the Camaro on there, just to check there were no tire issues (same bacspacing). I’m either going to get another pair of 18’s for the Camaro, and put the 17’s on the front of the ’55, or just get another pair of 17’s for the front of the ’55. The wheels from the camaro look good on the front, and seem to clear the frame with no problem. Won’t look as good as it would have with the Boyd’s on, but pretty good nonetheless.

Front-Uns.jpg

Painting Again

I’m determined to get the bodywork done in the next month or so, and set out today to prime the door that I had finished filling. The car was covered in dust, so it got wheeled out into the sunlight for a clean first. I was disspaointed to find the boot lid which I had cleaned up a few months ago was covered in surface rust. It’s my own fault for not doing things in a proper sequence. I gave it a good clean up with the orbital sander, then hung it from the roof ready to paint. A quick coat of etch primer went on with no issue or runs, which was a nice start. Chuffed with my success, I mixed up some high build primer, and started to paint. I hadn’t thinned it enough, so it left a rough finish. I quickly poured it back out, thinned it and finsihed the boot.

Boots-Primed.jpg

With that left to dry, I started cleaning the boot up. There was plenty of old seam sealer and muck stuck on there, so I got the worst of it off, and made sure all the rust was cleaned up. It’s going to have a carpet over it, so there’s no point going mental with it. I also cut off the spare wheel brackets as they were pretty ropey. I then re-did all the seams with sealer, and did inside the car as well as the boot. While it was drying, I got the slide hammer out and re-set the door pillar gap that I wasn’t happy with, and the boot lip. I then straightened the rear edge with a hammer, followed by a quick layer of fller to start re-shaping it as it’s had a hard life. Poppy was helping me at this point, so I put too much hardener in to make it pink, which she thought was great, but didn’t go on too smoothly! Plenty of sanding for me to do next week now. Last thing I did was hang the boot temporarily and put the car away. Feeling really positive about it all now.

Door-Gap.jpg

LT1 Cleaned and Smoothed

I finished stripping the LT1 down to the bare block and pulled the crank and cam out. The bearings were worn, but nothing too scary. The outside of the block was rusty and horrible, so I decided to clean it up, and smooth all the edges off at the same time. Why? I don’t know. Who’s going to see it? Nobody apart from me. Strangely enough I feel good that I did though. I took most of the rough bits down with an angle grider, then switched to the die grinder and hand files. I took the 327 that is cast into both sides off as well, and a lot of the little casting marks. There is still some rust that I can’t get to, so I’m hoping to get it blasted clean.

LT1-smoooved.jpg

I had an hour or so to work on it on Sunday, so I started off by knocking out the freeze plugs. I got them all out apart from the rear two which were blocked by the stand. I left them for when its off, and got back on the bodywork. The rear passenger door got knocked over in the garage ages ago and was scratched, so I sanded all the marks out, along with the filler that had been on there for months. It was low in one spot, and the metal was high in one spot so it was out with the panel hammers for the first time in ages. A quick clean off and a skim of filler and ready to sand when I get some time.

Back-to-fillink.jpg

The LT1 arrives

Roland brought the engine on Wednesday, and I had a day off to swap motors. The new motor turned out to be a 1993 from a Z28 Camaro, with air con, alternator and power steering installed. I pulled the factory exhaust manifolds off while it was on the floor and while I was at it took the staggered engine mounts off. The new motor has angle plug ally heads, so I wanted to see if my headers would fit. They fitted with no problem, they’ll just need O2 sensor bungs welded in.

LT1-as-it-landed.jpg

I was pretty sure the factory brackets would hit the frame if I kept the air con pump where it was, as the Camaro has the same problem. I got the motor on the crane and tried test fitting it. It did hit the frame, so I’ll need new, much nicer brackets. Shame eh? I didn’t want to risk building it all up and finding the engine needed a rebuild, so I got it on the stand and started stripping it down. I got the heads off and found the bores were glazed and stepped, so it’ll get at least a rebore to 355, and if I can stretch to it, it’ll become a 383. I stamped up the rods, and pulled them out to check the bearings. They were worn but nothing too scary. I’ll pull the crank once I get a hub puller as I might as well do the bearings while I’m in there.

Block-Stripped.jpg

And now, something different

In between keeping the Camaro going, I managed to get a start on filling the wing. It took ages for the filler to set as it was quite cold, and when it did I had to sand it in the other side of the garage as it was raining so I couldn not wheel the car out. With the amount of stuff in the garage, trying to keep the dust down is a nightmare. With the majority of it done, I set about drilling out the sheared bolt at the bottom of the wing. It was rusted in solid, and I ended up having to re-tap the hole.

Wingon.jpg

The filler panel was also in a bit of a mess. It looks like someone had tried to jack the car up on it at some point in the last fifty years. It took a fair bit of straightening, and it had pulled through on a few of the rivets. I pulled it off in the end and will weld it back on instead. I hung the wing and filler panel to see what it looked like, and was very happy with how it’s coming on. I am getting to know and love the computer controlled LT1 engine in the Camaro, and spotted one for sale on the NSRA forum. After thinking about it for a bit, I contacted the seller, Roland, and we agreed to swap engines. Am I mad? probably. But at least I should be able to drive it every day if I want to. I pulled the engine and box ready to swap and it all looks lonely.

no-motor.jpg

Not much to see

I had a few work problems Saturday morning, but managed a few hours in the afternoon. I pushed the car out into the sun and carried on with the wing I had started. I cleaned the remainder of the paint off, then sat down with the hammers to sort out the creases in it. The dent in the arch took ages to hammer out and match in with the rest of it, but I was more than happy with the result. It’s not perfect by any stretch, but it’s not bad for an amateur.

Beaten-Wing.jpg

There were a good few dents in the curved lip at the front of the wing which were much easier to do as you could get a dolly under there easily. A few on the edges were much harder as you just could not get anything behind them. I popped them back out and hammered them back in again. I was unhappy with the joins between the wing and the extension at the bottom, so I decided to weld them together to smooth it out. There was a split on the back as well, and the hole where the aerial was, so a quick half hour with the mig with plenty of time for it to cool down between welds and it was ready for the grinder. It will have to wait for next week tho, as Poppy came home and wanted to help me. She vacced the dirt up off the floor after I swept it out and helped push the car back in. She’s strong for a 3 year old!

Wing-Extension-On.jpg

4 Doors and a Boot

I got a tap and die set the other weekend and threaded the plate I made for the front door hinge. Amazing what you can do when you have the proper tools.Hanging doors on your own is not much fun and the drivers door turned into a nightmare. I could get the bolts into the bottom hinge, but could not get one of the top ones in. After an hour of trying to do it I realised the threads were knackered, and got the tap and die set out. Once it was re-threaded it was easy.The back door was easy, and after a bit of moving around got the gaps to where I was happy.

Das_Boot.jpg

With all that done, I got the boot lid out of the shed and stripped all the hardware off it. With the tarpaulin up to stop some of the dust I closed the door and spent the next few hours cleaning the paint off. There was a deep patch of filler too which I ground out to replace. I’d had enough by then and cleaned up till next week. The next week I sanded it all smooth with the air sander then started filling. There were a lot of fold marks in the metal, and quite a low spot on the left corner. While the filler was drying I got one of the wings out and started stripping it out. There was quite a nasty crease in this one, so I started to hammer it out. With another few low spots filled, I started taking the paint off with the grinder. It was getting late, so I sanded the boot again and called it a night. Needs more filler on the low spot in the corner, but not bad.

Wing_Waider.jpg