My New Radiator Arrives

With the 400 block going in, and plans for a 6-71 blower. I was concerned about cooling it all properly. After seeing a PRC radiator from StreetRod Stuff in the USI gave them a call and decided to go for it. They’re made to order, so I wasn’t expecting it to arrive quickly. Exactly one month later, it was in the UK
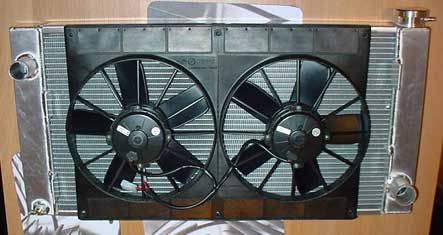
Rad_And_Fans.jpg

They’d sent me a drawing of it to approve, but I hadn’t realised how big it was. It’s best part of three feet wide! With dual 11″ Spal fans it should keep it all as cool as a cucumber. Will look cool too! What a fantastic comapny to deal with.
While cleaning the underside around the suspension mounts, I found the cracks that I’d read about being a common problem with Tri-5’s. Not the end of the world, but I’ll have to fit a shock bar or replace the metal. It gives me something else to research anyway! I’d better make a note to repair the crack before I put the bar on though.
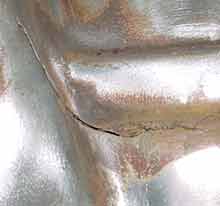
Crack.jpg

Almost done a section

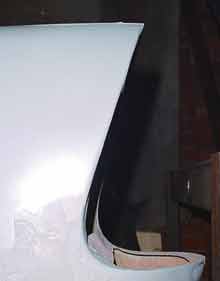
All I seem to have done the past few weekends is create loads of dust. I’ve skimmed the back drivers side and the top of the wing where I took the old lead out, then sanded, then skimmed again. I’ve ended up with a very thin layer of filler covering the dents, and have got to the point where I need to switch to a finer grade filler and sandpaper, so stopped for now.

Fintastic.jpg

I feel quite good about *almost* having done a section, but there’s plenty more to do. I spent a few hours sanding filler yesterday, then moved the lights in the garage so that I could swing the car up a bit further. It was way too cold to be outside anyway, so this should enable me to work in the garage a bit more. At least Lisa will be able to hear the TV without the noise of an angle grinder. That should also mean I get to stay working on the car for longer.

Drivers_Side_Pillar.jpg

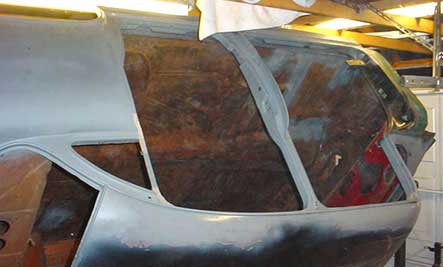
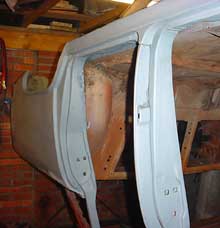
I spent a few hours today with the angle grinder brush cleaning the drivers side windscreen frame. It looked awful and took a fair bit of scraping before I used the grinder. The pillar was pitted where water must have been trapped behiind the seal, so I cleaned it till it was shiny before skimming it over. The grinder is beginning to vibrate badly, and the brush was badly worn, but I managed to join the clean bits of the front and the back of the car together. When the brush started to disintegrate too much, I switched to the scraper and took one half of the tarred sound deadening stuff off the roof. Then a skim of filler where the lead used to be, and a quick spray over with primer.

Drivers_Side.jpg

More Filler Oddness

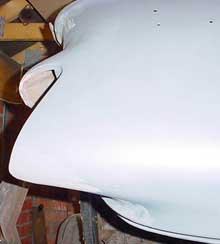
When I got the car, the rear drivers side wing had what looked like a new and neat repair done to it. I was loathe to dig into it with the grinder, as it looked like whoever had done it had rebuilt the top half of the fin. After finding all the other needless filler, I decided to investigate.

Wing_cut.jpg

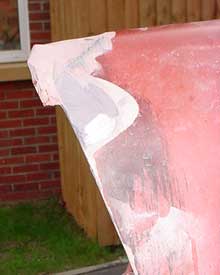
There seemed to be no dents I could feel inside the wing, which was odd as I could feel a thick layer of filler behind the mountings. Using the sander, I dug into filler on the top. After going through at least a quarter of an inch, I hit metal. I worked along and found no dents or rust, just good metal. Just in case, I decided to sand the mountings down, and again found metal. As you can see in the picture there was a complete new wing shape made of filler. Once all of it was cleaned off, the light surround fitted better than before.
I took it all out down to the metal and found a dent about half an inch deep and about an inch long on the tip, and some bad hammer work that had left dents in the wing. You could have done the whole lot with a thin skim. It took about an hours worth of hammering to get it smooth enough to use a really thin skim to finish. Bob was over giving me a hand, and he finish welded the floor repair I’d done ages ago while I sanded the rest of the wing.

Wing_Cleaned.jpg

I took even more filler out of the wing to find no dents, dings scratches anything. I’m beginning to think that whoever had the car before me had shares in a filler factory. It’s starting to look less like a tatty old car and more like one that’s being rebuilt. Bob had cleaned the bodywork on the door pillar and sill yesterday and I’d painted it over wih primer to stop it rusting too quickly. I think I’m going to take some time off and finish the cleaning while the neighbours are in work!

Side_On.jpg

Cleaning the Rear Quarter

After finding no real need so far for the filler that was on the rear drivers side, I was curious to see what was under the many layers of paint. Bob came over to give me a hand, and after spending a good few hours looking for sander discs we finally started working on the car. We wheeled it out into the fresh air and started to clean it off.

Drivers_Rear_Qtr.jpg

There was indeed a dent under all that filler. And not just one. It had been creased along the side, and there was a strange dent that had been beaten out with a claw hammer by the look of it. It took a couple of hours to get it mostly straight, but there were still a lot of dents to get out. I painted it to help see the shape, and you can see what it was like in the picture on the right.I spent a few hours that night researching panel beating on the net, then a good few more hours tapping the metal instead of whacking it with much better results the next day.
I got it as smooth as I could, then gave it a quick sand and opened the filler for the first time. The last time I used filler was on Bob’s beetle, and that was when I was 19! A really light skim later, I left it to dry. Once it was solid, I gave it all another quick spray over and left it alone for now. It feels good to be putting something on the car rather than taking it off.

Passenger_Rear_Qtr.jpg

Quarter Panel and Floor Cleaning

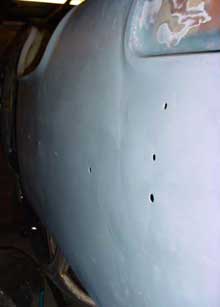
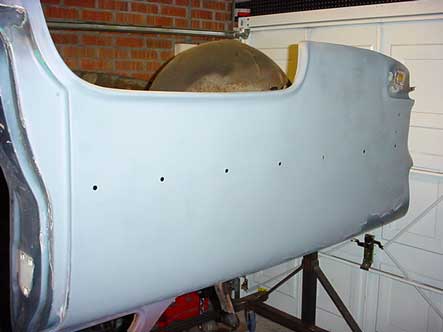
The weather is a nightmare here today. It’s raining, and there’s 70mph winds. No chance of getting the body out on the drive to clean like I planned. I decided to scrape away the paint on the rear quarter, to see if I could find primer like I did on the passenger side. Sure enough I did. This worried me so I took the grinder brush to it. And guess what? There’s no rust or dents. Just lots of filler. Strange. I gave it a sand, and flattened the trim holes where they had been dented over the years, then cleaned and primered it. As you can see, it’s as straight as a die. God knows why it was filled.

Rear_Quarter_Primered.jpg

Out of curiosity, I decided to see how far I could turn the tub on the rotisserie and found I could move it enough to work on the floor. I scraped all the underseal off, then wire brushed, vacced then grinder brushed. I managed to clamp it up tight enough to tack weld, so I started to work my way around hammering it flat and welding. About a quarter of the way through, I got the hang of the welder and managed to get a decent seam without blowing a hole or leaving a lump. An hour or so later it was done. A quick clean up with the grinder, then clean with thinners and a quick blow over with primer. I’m learning my lesson about leaving bare metal in a damp garage.

Floor_Repair_Primered.jpg

Yet more frame cleaning

Engine_in_a_bag.jpg Now I could get at the frame easily, I started cleaning it up ready to paint and plumb. I’ve learnt my lesson about the mess you make with a grinder brush, so covered up the front end with plastic, and also the assorted parts that are on the floor of the garage. I scraped the top layer of grime off the frame by hand, and it came off in rolls like butter. With the vac in my other hand, it made very little mess. Gearbox_Mount_Gone.jpg I also needed to finish cutting off the old gearbox mounts as they fouled the headers. It’s a lot easier to use a grinder without lying on your back, and I could also chisel off the leftover bits., then grind it back smooth. The new gearbox mount is on my list of things to do, as it’s a bit "Heath Robinson" as you can see in the pic above. I switched to using the grinder brush, and cleaned the tops and sides as far back as the back axle mounts. I’ll roll it out of the garage to do the end to save some of the mess. Then, using a rag soaked in thinners I cleaned the worst of the underseal off both sides. Another quick grinder brush, then another quick clean with thinners, and it’s all shiny again. Better paint it next week! Getting_Cleaner.jpg

The body comes off the Frame

I didn’t get any time on the car last weekend, so I was itching to get back in the garage this weekend. I’d found some plans for a rotisserie on Chevy Talk, and got it made for sensible money. Bob came over to give me a hand, and we spent a few hours trying to lift the body off the frame before finding the mounting bolt I’d missed. Once that was out it was a lot easier! The frame was a pain to move as I’d given the back axle away, and my new one is still not here. Once it was out of the way, we lifted the body onto the mounts using the crane.

BodyOnRotisserie.jpg

The body went straight on the rotisserie without any modifications whatever. Kevin, who’d made it for me had never even seen the car, let alone measured it. Good plans and well made I reckon. We wheeled it out on the drive and took the door that I could not get to off, then spun the body over to make sure it all worked. Nearly fifty years of assorted junk fell out.

DoityDoityFloor.jpg

It’s going to be a million times easier working on the car now, and it gave me the chance to clean the year of dirt that was under the car up. Once that was done, we turned the body upside down (It’ll only fit in the garage upside down!) and rolled it back in. It was getting late, and we were knackered so we called it a day.

UpsideDown.jpg

More bits off and Some More On

Had a few hours on the car again today, so I went and bought an impact driver to try and get the back doors off. It took me about 40 minutes to get two screws out. Once that was done, I crawled underneath and sprayed all the body mount bolts with WD40. I took the bumper off then, which was a pain as it was up against the wall. I ended up having to take the overrider off to remove it.

Back_Door_and_boot_off.jpg

Once that was done, I pulled the bootlid off while it was hung on the crane. That gave me enough room to get in the boot and undo the body mounts. I undid all the other mounts and finally had the body free. Now what?. I need to work out how I’m going to lift it. I put the other disc on the spindle and packed the bearings with grease. Now that both were done, I could put the old wheels on. Seems stupid, but I got such a buzz seeing the front with wheels on.

NewDiscs.jpg

It was getting late, so I started to tidy up a bit and decided to put the front back on its wheels. It’s been off them for best part of a year. I put the crane under to help level it, then jacked it up one side at a time and pulled the jack stands out. Then slowly lowered it down. It looks really, really low now. It should be about 3″ lower than stock. Now I’m really fired up!

Front_LOW.jpg

The Windscreen Comes Out

I got out in the garage again yesterday for a good few hours while my wife and daughter were out. My plan was to take the windscreen out, and maybe put the driver’s side brake rotor on. I must have spent at least half an hour looking at the trim and trying to work out how you take it off.

Drivers_Side_Doity.jpg

Some of the screws holding the trim on were rusted in and rounded, so they took a fair while to get out. I was scared to death of braking the glass, and wanted to try and keep the rubber intact so I could re-use it temporarily to get it MOT’ed before I painted it. I reckon that I could have done it in half the time with someone else holding on to the glass. Eventually I lifted it out, and placed it carefully up in the rafters on blankets. The trim wasn’t too badly damaged by me, but was pretty beaten up anyway. I’ll see how much some new stuff is before I put it back on.

Passenger_Side_Cleaner.jpg

I took the screen grille out, and removed the wipers. You couldn’t turn them by hand, and the wires were covered in paint under the dash. They look like they’ve had a beating but I reckon they’re fixable, which is nice. There were some areas that looked really rusty, so I grinder brushed the paint off. It wasn’t too bad at all, but had been filled in the past. I cleaned a good area around the screen and then gave it a quick spray with some primer to cover it temporarily until I start to work on it properly. Its amazing how much of a lift that gave me seeing some of it in gray. The engine is all covered up again while I do all this, as is my new suspension bits.

Engine_Socks.jpg

A bit of History found in the Car

Over the time I’ve spent taking the car to bits, I’ve found quite a few interesting things. Unfortunately, most of these have been newer than the 50’s stuff you hope to find to give you a clue about the cars life.

Mystery_Photo.jpg

I’ve found coins, broken earrings, faded receipts, leaves, insect shells, 4 pens, a couple of which were covered in overspray from the interior. A razor blade fell out of the dash and got stuck in my glove and loads more junk Under the back seat I found this picture of a woman with the word “Huera” written across it. Dunno who she is though.

When I took the headlining out of the car yesterday, I noticed an envleope tucked into the roof. It was an American “Validated Registration Card” letter that was sent to Jose S and Dolores L Bojorquez. The postmark is from Sacramento, California on Christmas Eve 1984. What an amazing find. I now know who owned the car when I was 14 years of age, and where they lived!

RegistrationCard.jpg