Door Edge Again

I decided to get rid of the original core support and crossmember as it wouldn’t fit the bigger radiator I got for free from a BMW X5. I levelled the front, then put the front wings and hood back on and took a lot of measurements. I made temporary wing supports out of wooden blocks, then cut it off where it was welded to the Camaro clip. I need to order up some box section to make the replacement now that I have a plan in my head as to what to do.
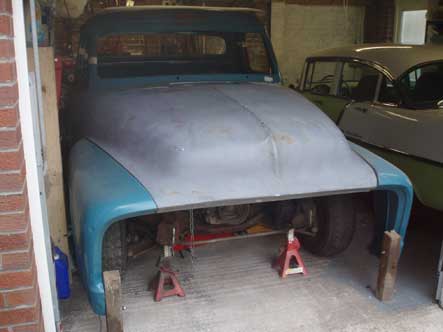
New Hood on Wood

I decided to pull the drivers door back off and cut the rotten parts of the bottom skin out. After a while with the grinder, I found the whole bottom of the door was as rotten as a pear. It’s too much to patch in,so I need to get some patch panels. After re-tapping the door hinge mount plates, I hung the door properly and found out the new edge that I made wasn’t as good as I thought. The gap ran out towards the top, and after thinking about it for a while, I cut it out and set about making another new one. The old hood became a sheet metal donor and after a few hours work I had a nice even gap. My self darkening mask had gone flat, so I had to use the old mask and I wasn’t happy with my welds, so I’ve left it to finish another day.
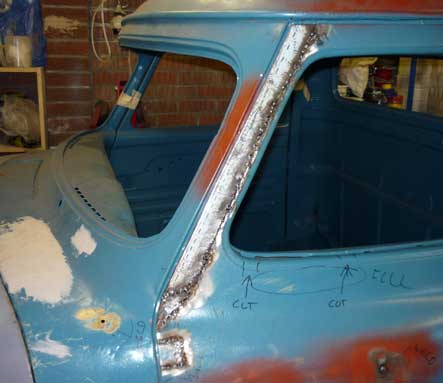
New Door Edge Again

Big Sway Bar and QA-1’s Fitted

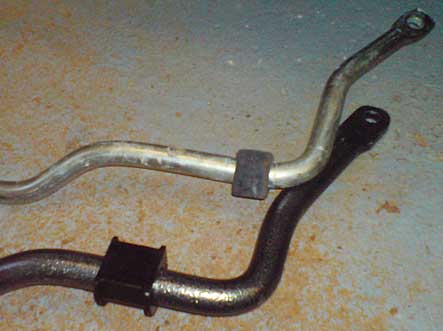
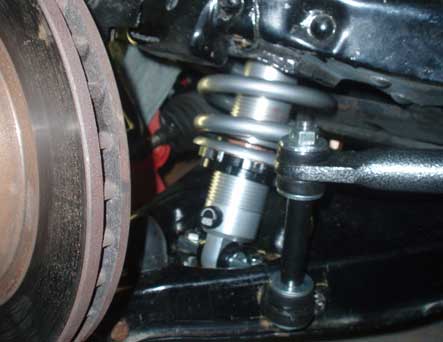
I haven’t updated the site in months, but I’ve still been working on the car. The Optispark distributor died (at the same time the one on the Camaro did as well, just to make matters worse). I had to take all the accessory drive off to get at it. With it all back together, and a small leak fixed, I got back to working on the car. I wasn’t happy with the way it handled even with the swaybar fitted. I decided to replace the swaybar with a Hellwig one, and put QA-1’s on the front as well. The Hellwig bar is much beefier than the old one, and had much better fixings to put it together. After a lot of messing about, I gave up on trying to get it fitted with the A arm brackets and use the ones I made for the old bar. SwayBarsTogether.jpg With that done I pulled the old springs and shocks out, and drilled out the A arms for the QA-1 bottom mounts. I ground the rest of the old nuts flat and fitted them on the lowest setting. Unfortunately I crushed a brake hose while I was doing it, so I needed to replace and bleed the brakes. It was so low I couldn’t get the jack under the frame, so I bought a C spanner to raise it back up. I wound them up about an inch a side (I measured with a bolt as I couldn’t get the calipers in there). With it back on the deck, and the brakes bled I took it out for a spin. It handles a million times better now, but the brakes still have air in them so need bleeding again. Progress at last. QA1s.jpg
Truck Gets a Better Hood

I’ve still been working on the truck, just haven’t updated the site in a long time. I finally got the drivers side rear cab corner in decent enough shape to skim with filler. I also made a start on trying to sort the door out. It was a completely different shape to the frame at the back, and I decided to hacksaw through in a few places and bend it back. With a few tack welds in place it looked a lot better than before. The front edge of the door frame was also a different shape to the screen frame. After a lot of thinking, I decided to slice it off and make a new one from sheet metal.

As it sits Today

It took a lot of measuring and messing about to get it close but it should be a lot better once the door is re-hung. While I was at it I filled the mirror slot in the door. I’m getting a lot happier about the way it looks now, but I’ve got an awful lot of work still to do. I found a hood in the UK that had been replaced for a better one. I emailed the owner, and sent him a pic of mine and asked if it was in better shape than mine, which he reckoned it was!. I got it collected, and with a bit of help from Tommy got it balanced on the body for a pic. It’s a million times better than what I had, so that’s made a major amount of work into a much smaller job.

Tommo and the Hood :)

Wing Repairs

I’ve still had enough of doing the truck roof for now, so decided it was time to make some space in the roof of the garage for the front end. After pulling down the rear of the truck and putting it all back up again in a different place I had enough space to get it all up there apart from the hood which was too big. That’s in the shed for now so it’s on with the wings and front end metal. After looking at it all for a bit I decided I was going to make a new core support and chop out what was there but I’ll make a start on the wings first.

Truck in the Roof

There were a few creases in the drivers side one, and the front edge had a bad fold in it.Apart from that it was in pretty good condition. I welded some washers to the creases and slide hammered them out a bit as I couldn’t get behind to pop them back out. I then spent a good few hours trying to sort out the flat area of the wing but it was stretched and needed shrinking. After a lot of time messing about, I came to the conclusion that I can’t shrink metal to save my life. I’d had enough, so drew a rough square with a marker and chopped it out with the grinder. I cut out a quick replacement and set about welding it in and ended up with a result in a lot less time than I’d spent trying to shrink it. I didn’t want to warp it trying to seam it, so it needs some more work next weekend to join all the tacks together.

Wing Patch

Head Off for a Look

I’ve been planning the engine rebuild for the truck for a while now and needed to pull a head off and see if I had a tired old smoker or a half decent base for the turbo motor. It had been raining all day here, so I did some more work on the door gaps and hoped the weather would improve. It had stopped raining when I went in to get a cup of tea, so when I came back out I pulled off the hood and set about pulling one of the heads off. It all came apart easily and just as I was lifting the head off it started to rain again with the bare metal hood outside. By the time I realised it was raining it was soaked, so I left it out there as it wasnt going to get any wetter and carried on.

One Head Off

I was pleased to still be able to see the factory cross hatch on the cylinder walls, and the carbon lip at the end of the cylinder was almost non existent. This is good news as the pistons I’d bought on impulse from ebay were stock bore sized and I was worried I wouldn’t be able to use them. I took a few pics and popped the head back on for now. I also thought I’d need a new throttle body to fit the LS1 manifold as it had a fly-by-wire one on there, but after checking I found the truck one bolted straight up. It’ll need the outlet moving on the water pump and the idler moved to get it on there properly, but it’ll be worth it not to have the hideous truck manifold.

Cylinder Walls

Squeaky Belts and Seat Belts

I’ve been tuning the Camaro for a few weeks now, and wasnt happy with the results. After a lot of research I realised I’d have to start again as the MAF was screwing up the logging. I knew I’d have to do the same on the ’55 so decided to pull the MAF out and replace it with a tube instead. While I had it all disconnected I set about trying to sort out the bearing squeak from the serpentine. I’d ground the mounting tabs of the alternator down last weekend to bring it further forward, and decided it was down to tension in the end. I undid the top mount and backed off the belt till the tension was right., then made a strap to hold it in place while I tested it. A quick fire up and no sign of the squeak, so that’s that done till I make a decent bracket.

Look-Ma-No-Maf.jpg

I’d also bought the seatbelts for the car this week, after deciding that driving it without them was just plain dumb. The pillar mounts had been put in by Zane when he did the exhaust and stuff so it was a pretty easy job. It took longer to swap the latches on the seats than it did to fit the rest of the belts. With it now a lot safer, I can take Poppy to school in it so I put the manky old door panel on temporarily for her and fitted a door handle. A bit of a test drive with the datalogger showed my new map which I’d based on a tune I’d downloaded was close enough to get me started so after it had settled a bit I gave it some stick. I hit the rev limiter, even with the pedal travel limited to 90 odd percent (Just in case). Reading through the logs afterwards revealed that the blow off valve is dumping boost when it shouldnt be, so that will need a better restriction in the hose. After a bit of googling I found the suggestion of using a welder tip, so it’s got a 0.6mm one in there now, and the new map based on the drive is in there ready to do some more driving.

First-Map.jpg

Ignition Problems

The Camaro has been doing 90 miles a day taking me to work and back without too much hassle, apart from when we had a week or so of freak weather and it was raining so heavily it was a struggle to drive at 30mph on the motorway. The car got so wet that the optispark distributor got soaked and was misfiring and popping through the exhaust. It cleared up once it dried out a bit but it’s had an occasional miss ever since.

MSD & Filter unit

I moved the air intake up higher as it was wet when I checked it, and did a week of logging and tuning which smoothed it right out but I still have the miss. I’m 99% sure its the distributor, but as it’s a pain in the ass to change and quite expensive I decided to fit the MSD box that I had waiting for it and see if it sorted it. It has cleared it up quite a bit, but it’s still there so I guess I’ll have to just get on with it. It’s also had really bad steering and was eating front tires. After a lot of checking I found the idler arm was worn and it was moving to an inch of toe out from being slightly toe’d in when set up. With that done, it’s a lot better but I’m swapping the rubber bushings for poly ones and getting it set up again.

The Maro


And Now….. Frankenroof

I’ve been spending plenty of time working on getting the roof dent free and it’s getting there slowly. Very slowly. I decided I wasn’t happy with the roof chop, so just to give myself more work I cut the drivers side rear window quarter and door frame back off and put it all back on so that it lined up properly. This turned out to be a lot of hard work due to it being all over the place and it was so far out on the door frame I ended up using the slide hammer to pull it into line. I’ve been trying to teach myself panel beating as I work on the truck, so rather than hide it all with filler, I spent ages getting it smooth in metal. I’m pretty happy with where I got to with it, and have started to move along the roof join filling it in as I go.

Re-Chop Yer Top

When I get bored with planishing the roof, I pick a random piece and do a repair to keep me from going crazy. I cut out a big dent in the cab back and patched that, and today I decided to do the door edge where it was rotten. It’s also pin holed along the bottom edge so I may cut the lot off and do the whole edge. The patch was an easy one to do, and the only problem I had was my auto darkening welding mask going flat so I had to use my old one and couldnt see to weld properly. I got it tacked in position anyway and the mask is on the window sill to get a charge when we get some sun.

Door Patch

Bit of Tidying Up

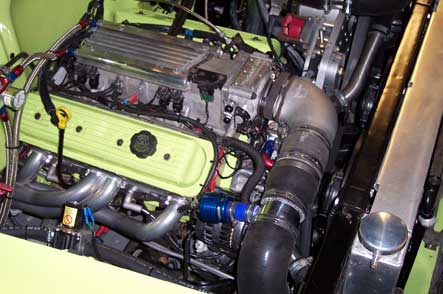
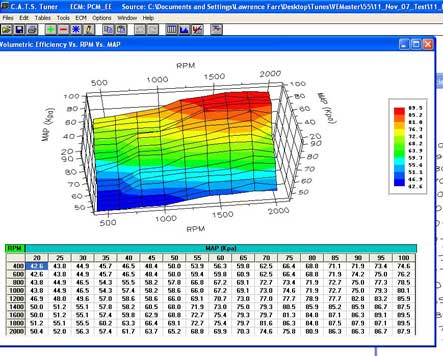
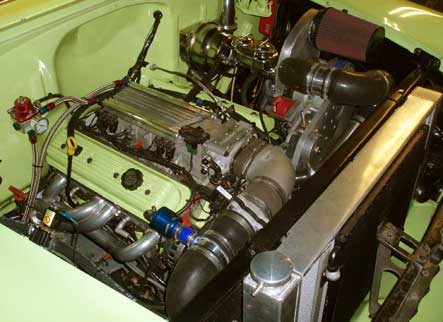
I’ve been doing lots of little jobs on the car over the last month, and decided it was time to sit down and do an update. The trunk has it’s seal fitted now, a couple of the doors have the old dirty door cards fitted temporarily and the heater control solenoid is fitted and functioning ready for some winter driving. I’ve also started to tune the car for part throttle and idle. It was running way too rich at idle as I’ve forced the computer to not control thr fuelling when it’s below 1200rpm and that gave me about 10:1 AFR. I got it to sit at 13.5:1 on my second guess so that’ll do for now. I also did a couple of short runs with the datalogger on and started to set the volumetric efficiency tables up. It’s smoother already as it should be, and with a few 45 minute runs to work planned in the next week or so I should end up with it pretty much nailed.

Motor-Tidied.jpg

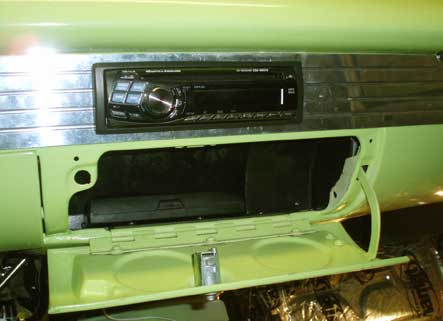
It’s getting pretty cold here so I wanted to get the heating outlets fitted and functional. It was a relatively easy job so I decided to fit the stereo and the glovebox while I was at it. After about an hour of messing about, I realised the dash was bent out of shape which was why the screws wouldnt reach. With it bent back into shape, and some trimming done I screwed it all together and called it quits. The only other job I did was some tidying on the wiring to tape some odd wires, and zip tie it all to the core support out of the way. Looking forward to driving it this week as Poppy is on half term so I’m not doing the school run.

Radio-and-Box.jpg

Out for its first proper drive

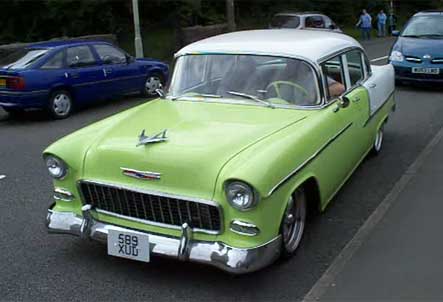
I spent a couple of nights in the week working on the car, and got some bits and pieces that I could do without making too much noise done. I got the sway bar brackets clearanced and painted then re-fitted it all, got the procharger pipework back in and tightened up and the intercooler bolted up tight. I also got a catch can fitted and re-routed all the rubber pipework and some of the engine wiring. I’d also noticed the ignition key getting hot, even though all the heavy circuits are on relays, so I pulled it and fitted some heavy duty relays to take all of the load from the switch. I did an oil and filter change on Saturday and decided to take it out for a proper drive on Sunday. My mate John was going to a classic car show that was about 25 miles from the house, and needed to borrow my scanner, so I emptied out all the junk, put some tools in a bag, temporarily wired in the sat nav and I was on my way. I set the speedo as I drove using the sat nav as a reference, and it’s pretty much spot on. I stopped off at my parents house on the way, and pumped up a low tyre and set off again. It drove really well, and apart from being unbelievably hot inside it was faultless. It definately needs some tuning but according to the datalogger its running OK. After getting a cold drink and a quick hello, I set off again and John took some video of the car. As I drove off the throttle cable decided to come loose, so after a quick repair and moving the Lokar pedal so it wasnt stopping on the cable I was off.

Me-on-The-Road.jpg

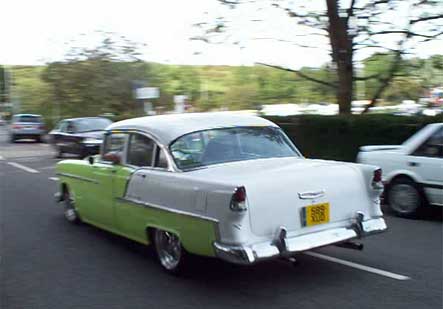
On the way home it developed a knock in the front end somewhere, but drove well so I carried on home. I cant see anything obvious, and it was way too hot to climb under so I put it in the garage and will have a look at it in the week. The only other issue I found was the headlights have stopped working, I cant hear the relays clicking so I’ll have a look at that as well. Pretty damn happy with it I must say. Really, really need a carpet in there as my trainers were sticking to the floor! Oh and heres a video of it on YouTube, courtesy of John.

Me-Leaving.jpg