The Last of the Doors

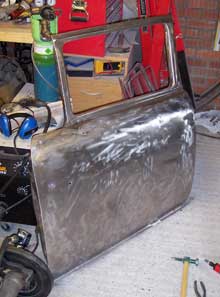
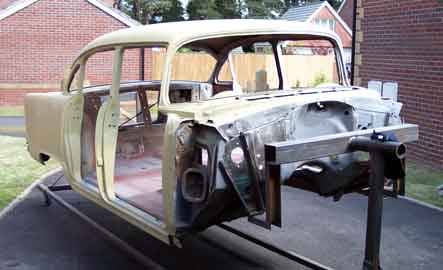
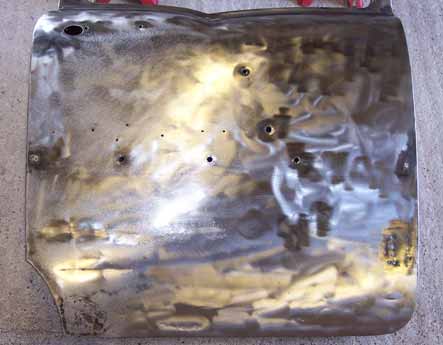
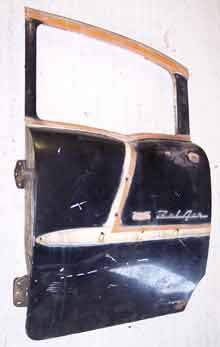
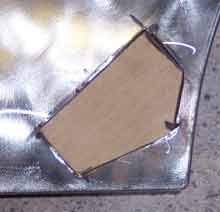
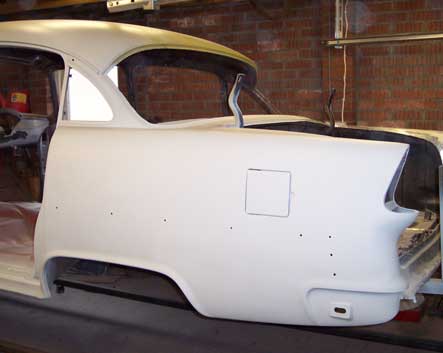
I was away last weekend, so didn’t get chance to do any work on the car. On Saturday, it rained heavily all day, and I didn’t want to work with the shell in the garage because of the mess it makes stripping the doors. Sunday was dry, so out came the shell, and I set about the drivers door. Hardly any filler in it, which was a welcome surprise after the other three. What I did find was a hole in the top filled with filler, and a split between the curved and the upright parts of the skin at the front edge.

DoorSplitRepaired.jpg

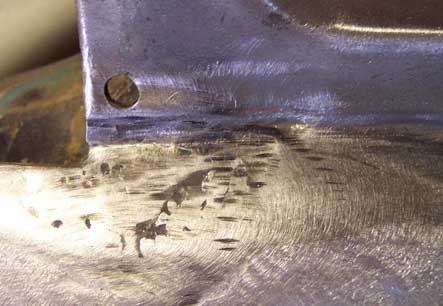
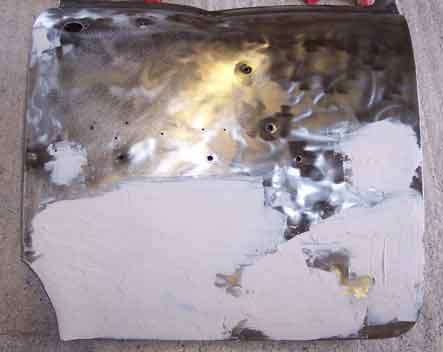
The hole was about half an inch across, and had been hammered in. I ground the area clean with the die grinder, and then cut a small patch of metal and shaped it to fit. I carefully welded around the edge of the patch, then ground it down smooth, and welded up the split along the door. Another ten minutes with the grinder, and it was done. I gave it a quick sand, and had to leave it for the day as it was tipping down with rain again. I’ll finish it off next weekend and fill and paint it then.

DriversDoor.jpg

Yet Another Door

PS_ShinyReady.jpg

I spent a good few hours yesterday stripping the front passenger door. Straight away dug into filler, and struggled to find any metal. It was literally covered from top to bottom in filler of varying thickness. With it all ground out it was easy to see why, another large crease, some deep half moon dents, and hammer marks. I hammered the worst of the crease and the moon shaped dents out, and covered over most of the dents. I sanded it enough to realise I had missed a load of the dent so put some more on and left if for the day.

PS_Painted.jpg

I started on the door again today, and sanded with the long block of wood for a few hours along with a few patches of filler. Once I was happy it was near to flat, I used the air sander to smooth it all out. Another hour or so, and the metal and filler were smooth and shiny. I put stopper on a few metal scratches and some small pinholes in the filler. I gave it all another polish and cleaned up all the dust and dirt. Once it was sprayed with etch, it looked great, apart from the usual run. I was so chuffed, I had to take a pic with the trim balanced on there.

Ooh_ShinyBits.jpg

Doors Revisited

It was another boiling hot day, so what better to do than hand sand in a hot garage? I used a long block of wood I pinched off my father, and got the banana door much flatter. It also showed how low the filler was in places, so I gouged and re-filled it here and there. I had decided to give the original gun another go, so I sanded the insides of the doors again to make sure they were clean and put the passenger door up against the wall.

DoorsPaintedInside.jpg

I set the gun up as I thought was right, sprayed a stripe on the wall, and set about the door. I got a good even coverage, and managed to do the lot with no real problems. I left it dry for ten minutes or so, and it was smooth when I checked it. Was chuffed to bits, so waited another ten minutes or so and did the inside of both doors. Again, no problem, apart from moving too slow and getting a run on a corner. Left them to dry, and re-sanded the dash and roof crossmembers, cleaned them off, and then wheeled the car back in to spray them. It went on neatly, and easily, and apart from getting dust in the paint was great. Feel good about painting the car now!

ShellOnRotisserie.jpg

“Banana Shaped Door found in Shed”

After the one door seemed to go quite well, I decided to do the other rear door. About 2 minutes into it, I discovered deep filler, and by the time I had ground it all out, found a few really deep grroves down it, and lots of hammer marks, plus the same rusted out corner as the other side. I hammered the creases out as best I could from the other side, but most of it was unreachable, and what I did get to was stretched badly. I’ve never done metal shrinking, so decided to dent it with a picking hammer to stop it “popping”. I cut and welded a repair patch as I had for the other side, and you can see how bad the door was below. This was after I had patched and hammered it!

SorryLookingDoor.jpg

I filled it where I thought it needed it, and soon realised it needed most of the door skimming lightly, so scuffed it and put more on. I gave this a quick sand, and managed to make it too low in places, so had to scuff it and fill it again. It was getting late, and I was pissed off with it, so I left it to do another day.

SorryDoorFilled.jpg

Starting on the Doors

I filled the three big dents in the roof yesterday, and sanded it out in the sunshine. Then wheeled the car back in to paint it, and made a complete mess of it. It was so bad, I wiped it off while it was wet and did a very light coat again. I let it dry, then next day sanded it all out and had a go with a smaller gun that my mate John had leant me. Much better, and a smoother result. I think it’s time to get a decent gun before trying any more. As the weather was good and the neighbours were in the garden, I decided not to paint today, and to clean one of the doors instead. The rear drivers side was worst, so I stripped off all the trim and glass and started to clean it.

DoorUntouched.jpg

A few hours with the grinder left it all looking as new, apart from a rust hole in the corner. I ground it out with a die grinder, then cut the edges in straight lines and made a cardboard template to fit, then cut a patch that fitted tightly. I welded this in, then ground it all flat and filled this and the dents in the door.

PatchCut.jpg

It was getting late, so I sanded it all out quickly, and put the door on axle stands against the wall for painting. I used the gun John had leant me again, and painted it top to bottom without any problems. Well, that’s one down, three to go….

DoorPrimed.jpg

Another go with Etch Primer

DashEtched.jpg

It was a warm day here, so I wheeled the shell outside and used thinners to take the aerosol primer off the other side of the car and the dash. Once the majority of it was off, I sanded the rest, and cleaned the rear quarter where the bumper goes and some spots on the dash with the remains of the grinder brush. It was all washed clean and then left in the sun to dry. I wheeled it back in the other way round to last week so that I could paint it with etch. I decided to set the gun up from minimum which was better, but still didn’t seem right as I got a run straight away. After scratching my head a bit, and adjusting the air on the gun, I realised the air control was not working properly. I pulled it apart, then put it back together properly, and managed to paint the rest of the side, and the dash without any real problems, apart from a few spots where I was just a little too quick or slow. Looks good though. More practice and a better gun I think.

PassengerSideEtch.jpg

First go with High Build Primer

MipaGreyRear.jpg

After it all going a bit wrong with the etch primer, I decided to sand out the runs and have a go of the high build primer I’d bought. It’s a lot thicker, as you would expect, and I set the gun and gave it a go on the rear quarter. Straight away I had a much better finish, so I carried on and covered part of the roof. The roof came out a lot smoother than the quarter, which was a little rough when it dried. I went and got some measuring cups from the local Asda, and mixed some more paint with a bit more science. This went on much better, and I did the pillars and sill. All looks good to me.

NeatAndGrey.jpg

Another go at Painting

Had the day off today, so got a few hours in the garage. I decided to clean and paint the last piece of floor, and clean the old paint off from the cowl corners and the vents in front of the screen. I also cleaned the aerosol primed areas back to metal using thinners. An hour or so with the grinder and some sandpaper and the floor and footwell was ready to paint. There were a few little bits of filler that needed doing, along with a small dent in the roof I did.

FloorDoneandDoorCleaned.jpg

I vacced up and blew the car clean with the airline, then cleaned the roof and sides with clean rags. Then I turned the car on it’s side, and propped it up so I could work on the roof. Cleaned, then mixed up some more of the etch primer I was using and had a go at the roof. The gun was set wrongly and I got a lot of spatter, so I re-set it and did a few more stripes. Still wrong, but better. I re-set it again, and got an OK result, not great tho. By this point I’d covered half the roof, so I carried on and did the other half. The top half was full of runs, but the second half was OK. I then did the door pillars, and that all ran too. I think I had too much paint flowing and not enough air pressure. Dissapointed, but not disheartened. I’ll sand it all out and try again.

WellitsPaintedAnyway.jpg

First go at Painting

Did some more sanding and filling this weekend. I was determined to have a go with the gun and paint I had bought the other day. Bob came over and gave me a hand with the sanding, so we got the wing just about done. I was extremely nervous about using the paint as I could smell through the mask which didn’t seem right at all. I used most of the paint that I had mixed setting the gun up, then had a go on the panel. I realised straight away the pressure was too low, re-set it and then ran out of paint. I washed the gun out and closed the garage up for the night. Later I realised the filters were not seated properly and one of the one way breathers was folded open.

ClarkeGun.jpg

Sunday, I sanded out the areas I was not happy with and re-filled some of it. I was running out of time so vacced the garage out, cleaned the dust off and pushed the car back in. It was earlier than I had thought, so decided to have another go at painting. I’d read up about how to set the gun up on the net, but it was set too heavy for me and I got a run. I re-set it and sprayed the rest of the panel without any problems. Dunno if it’s good, bad or indifferent, but I’m happy. Could’nt smell paint either.

OohItsPainted.jpg

More Ebay Madness

One of the people who is on the UK Hotrods mailing list mailed that he was selling an F100 pick up truck, which is one of the cars I’d wanted for years. I had a look at the auction, fell in love with it, and immediately bid on it. I got outbid within a few hours and after bidding again decided to go and have a look at it. It’s had the roof chopped, been lowered, and seems to have Chevrolet running gear underneath. The bed is full of various parts, and theres a windscreen on the floor of the cab.

Head on at Oagys

After looking at it, I decided to leave it till the end and have another go. I had too much to drink, put too much money in, and won it in the last 10 seconds There’s probably a valuable lesson in there somewhere. I had nowhere to put it, as the garage was full of Bel Air, and no way of getting it home. I spoke to a mate of mine who offered to store it for me in his warehouse, and also got hold of a flatbed recovery truck to collect it. After a few scrapes getting it on and off (it’s as low as it looks) it was safely tucked away till I’ve got space and time to do it. I can’t wait.

Front at Oagys