Shiny Roof

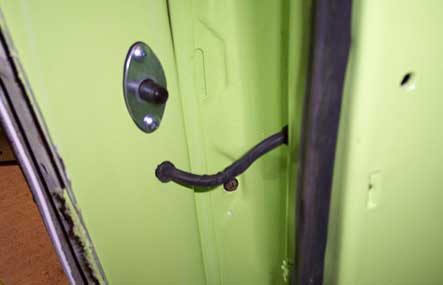
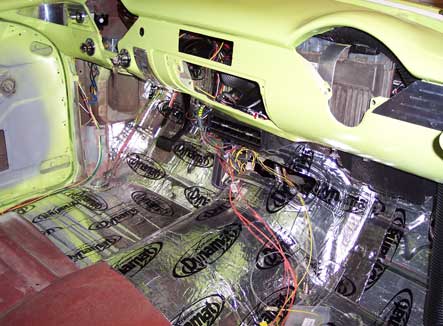
After getting the drivers side windows done last week, I planned to get the passenger ones done and out of the way this weekend. It’s Mothers Day on Sunday, so I only have a few hours to work on the car so I should have been able to get it done easily. I had both windows done and fitted and the channels ready to go in within an hour, so was happy with progress. I couldn’t get the rear door open far enough to fit the channel and it was raining heavily so it will have to wait for another day. With that done I emptied the car out and gave the roof a good clean with panel wipe ready to put the soundproofing on. I had nearly run out of Dynamat, so I bought some cheaper stuff called eDead. It’s much thinner and nowhere near as good it seems from my non scientific testing of tapping the panels and listening for vibration. I doubled up in a strip down the centre which definately improved it, so if I have any Dynanat left afterI do the boot I’ll put some in the centre.

Matted-Sky.jpg

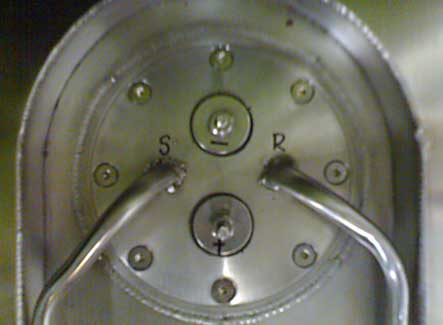
With that done, a quick tidy up and then taped up the last of the wiring in the back of the car now that there are hopefully no more to go in. I decided to pull the tank and see if I could work out why my new sender did not work, and with it dropped on to the floor it seemed to be broken or not connected to earth on the tank. With the sender out, it showed the correct resistance, it just had no metal to metal contact as the crews were O ringed. I pulled one of them off and put it all back together and it worked perfectly. An hour later I managed to finally get the straps back in due to me forgetting to get longer coach bolts and struggling to hold up the tank, pull the strap tight and fit the nut to so little thread. Ah well, done now, will put it on my list.

Tank-Top.jpg

Repair Progress

The chassis work that needed doing after the accident was getting done by Zane at Zannetec and when I sat down with him to work out exactly what needed to be done, he agreed to fit the AC at the same time as the repairs. The rear axle turned out to have a bent halfshaft and was in need of a rebuild. While it was all in bits Zane also fitted the Baer brakes and rotors for the rear which should balance out my braking system a bit. The AC took a lot of messing about to clear everything, and some of it had to be fabricated to suit. With it all done, Zane delivered it to the paintshop who I’d found to do the work, who handily were only about a mile from the house.

Striiiipppppeeedd

With new doors and wings to fit, they set about repairing the rest and taking all the orange paint off ready to pain the car in its new colour. There were no real horror stories under the paint but some cracks of the factory joins were cut out and remade with weld. I also took the spoiler off along with all the chrome trim that I didn’t want to go back on. They filled and sanded then filled and sanded some more till they were happy with the way it all looked then got it into the booth for some high build primer. They were concerned about my choice of colour, as it seemed very bright so wanted me to come down and agree it before they went any further. I loved it straight away and knew it would be right for the car so told them to carry on.

Roof Primed

Windows 2006

I picked up the new glass in the week, so the plan was to fit some of it this weekend. I put the rear quarter in when I took the glass in there that night, and I decided to get the rear screen down to compare the tint. I pushed it out on Saturday and carefully lifted the rear screen down from where it had sat in the roof for the last two years. I didn’t want to risk cracking the glass so I got the new seal out and fitted it before resting it on the car. Not sure if it’s on the right way round but it’s not fitted yet so it doesn’t matter too much. With the car safely back in the garage i started to carefully bend the fur channels into shape. It’s harder to do than it looks, and I managed to get one side perfect and the other at a slightly different angle.

Glazing-Over.jpg

Not the end of the world, just annoying. I had pinched an old inner tube from the garage across the road from work so cut a strip to put in the glass channel to hold it tight. It’s a tight fit to get the new glass in at the back, but after a bit of careful moving about I got it in place and tested the window. Worked perfectly, so screwed the channel in place and had a go at the front. This all went a bit wrong when I kinked the channel, but I managed to straighten it back out and work from the other end to hide the damage. I popped the vent in temporarily too and there it was, one side glazed. Apart from the window winder mechanism being badly worn it’s all good.

Winda.jpg

Yet More Dynamat

I cleaned and covered the last door that needed Dynamatting on Tuesday evening. The drivers door lock didn’t seem to be working that well, and the rear one was sticking so I took them out and cleaned them up again. The problem with the drivers lock turned out to be a bent lever so a quick straightening and it all worked nicely. I also put the windscreen drains in then called it a night. I took the old side glass to a glaziers round the corner from work as well to get some replacements made. They should be done this week, so I can get a start on glazing it next weekend.

Floor-Shiny.jpg

I got one of the seats down from the attic on Saturday to measure up for the rails. I got the drivers seat down so that I could have a look at the wiring for it at the same time. After a quick check, I wired it to the battery and tested the motors. With that done I measured up where the seat hit the transmission tunnel and hammered it flat there. It’s only about half an inch so it shouldn’t cause any issues with clearance for the gearbox. On Sunday I had a quick cleanout of the car and scrubbed it over with panel wipe to get the worst of it off. I covered from behind the front seats up to the parcel shelf with a box of Dynamat. I think I’ll run out by the time I get to the roof, so I’d better get some more in.

Nice-Back-End.jpg

Alarm and More Dynamat

It was a nice dry day on Saturday, so I got the car out and turned it round to work on the other side. I had a quick sweep up and then started on the door looms. The drivers front went in much easier than the passenger side, so I was just about to do the rear door when I realised I’d forgotten the speaker wires. Oops. I took it all back out again and re-did it, practice makes perfect eh?. I did the rear one as well and then soldered in some extension wires so that I could connect up the motors. A quick test and it all worked so it was on to fitting the alarm. It came with loads of extra input and output wires so the first thing I did was sort the wires and cap off the ones I didn’t need. Door-Matted.jpg 
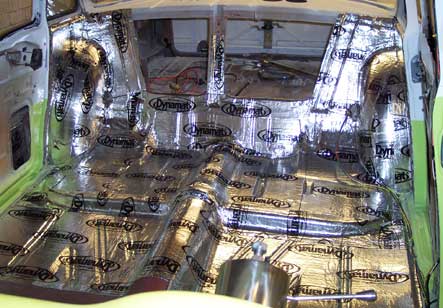
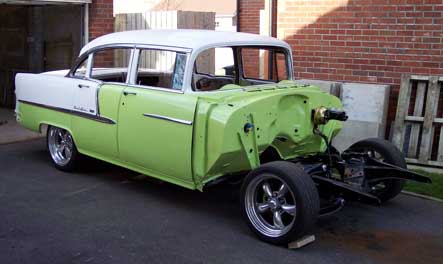
It needed to tie into a lot of the existing wiring, so it was a pain to cut into it and keep the wiring neat. With it all done, I powered it all up. No flash from the indicators and no LED or siren but the central locking worked from the remote.. After 20 minutes or so of double checking, I realised I had crossed over the battery and ignition live wires. With it swapped over the siren chirped and the led showed status. I unlocked it again and started to tidy up the wiring a bit. The alarm is smart enough to re-lock and re-arm if you haven’t opened one of the doors. Well, it re-armed and while I was thinking about what it might have been I set off the motion detector and the siren which I was right next to went off and scared the living daylights out of me. With that all done, I cleaned up the drivers door inner and vacced it out ready to fit the Dynamat. It makes an audible difference to the doors, they make a nice thud when you shut them instead of sounding hollow and rattly. Just one more door left to do and it’s on to the boot. The engine went out for machining and balancing this week, so I should get that back in a few weeks ready to go straight in. Getting closer all the time. Piston.jpg

Central Locking is in

The last bit of the wiring that needed to go in was the central locking, and an alarm. I wanted to make sure that the motors did not get in the way of the window mechanisms, so I dug the old glass out to fit temporarily to check. The glass channel on the front door has two brackets that are riveted in, and one of them had broken off. The glass had to come out of the channel to put it back on, and there was a crack in the window so I carefully ran a knife through the existing seal and tried to cut it loose. It wouldn’t shift, even when I tried to melt it out with the heat gun so I had no choice but to carefully prise it off. It cracked some more, but stayed in one piece so I taped it up to keep it together and tacked the bracket back on. I wedged the glas in with some cardboard and fitted it back in the door. Windows! For the first time in years.

Door-A-loomin.jpg

With that done, I positioned the motor where I thought it should go then marked and drilled it. I clamped it all up to test it before going any further, and after a few little adjustments it worked perfectly. I drilled the other hole for it and that was one done, three to go. The back door was a bit more awkward but worked fine after testing it. The one thing that was worrying me was getting the wiring from the body to the door as they are such a wide opening. I decided to go for it and drilled two holes and fed the lock wires through along with speaker wires. I heatshrunk it to hold it together as one lump, and fitted grommets into both holes. It needed to be bent down a little so that it stayed in the door frame area when it closed, but apart from that works perfectly. I did the same on the back door wiring, and fitted the other two motors using the measurements from the other doors. The front passenger door lock needed another clean up to work smoothly, and the rear drivers side is sticking too so that will need a clean when I turn the car round. Just the other two door looms and I can hang up my soldering iron for a while.

Rear-Loom.jpg

Shiny Floor

I got the Dynamat to do the car a week or so, and realised I needed to do the firewall behind the AC box. I pulled it all back out and cleaned the floor and firewall ready to cover, then matted up to the underneath of the dash. With the one side done I re-hung the AC and did it all up tight with no problems. Next on the list was yet more wiring, and the box of grommets that I had ordered meant I could put one over the engine loom and re-connect all the wires I cut when I fed it through the firewall. I’d tinned all the wires in the week, so it was just a big soldering and heatshrinking job. Dynamatastic.jpg 
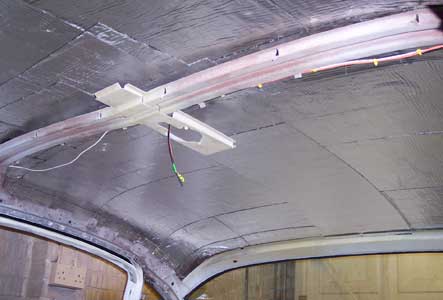
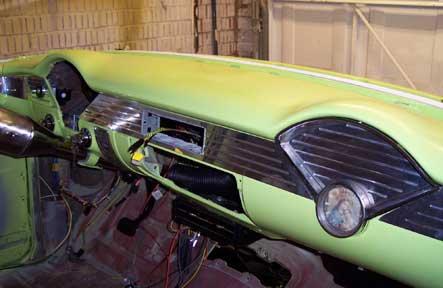
I used a trestle with a wooden block clamped on to hold my soldering helper up high enough to hold the wiring as I was doing it, and after cutting loads of heatshrink up ready I settled down sat on the crossmember and got on with the job. I’d cut the bundles in slightly different places so that I didn’t end up with a thick part in the loom when the heatshrink was on. A few hours later it was all done and wrapped up with tape and I moved on to the connections to the new wiring for relays and all the other bits. With these done it’s pretty much ready to go now. I pulled the column back out and dynamatted the drivers side and bundled up the wiring loosely until the central locking is in, which should be the last of the wiring. For now at least anyway. Oh, and I turned the brake booster up the right way. Ahem. Wires-a-looming.jpg

Bit of a Squeeze

As a bit of a break from wiring, I fitted the front shocks on Saturday. The powder coat had filled the bolt holes so after a quick run through with a thread chaser I fitted them both with new hardware. With that done I made a bracket to hold the PCM in place behind the clock using some aluminium strip my mate John had given me. With it in place I made a longer bracket for the AC box to mount on the bottom of the dash and while I had the jigsaw out I cut the centre trim to fit the radio.I was concerned I’d get everything in and clear the wiper drive, so I fitred the pipework for the Vintage Air kit. Unsurprisingly it hit, and after a bit of messing about I called it quits for the day and to have a think.

PCM-at-home.jpg

With a fresh set of eyes on Sunday I realised I could run the vent tubes over the top of the PCM but would struggle to get the glovebox and the stereo With the stereo from the Camaro squeezed in I found that it hit the wiper drive. The tubing was pushing it up, so I squeezed it oval with a tie wrap and tried again. This time it fitted and with a bit of moving about and so did the glove box. Back on to the wiring then, and I went through the PCM loom and capped off or removed any un-needed wires. I extended some of the wiring so that I could fit the new fuseboard and then taped it all up into a much neater looking run. It”s ready to connect in pernamently now, so I’ll strip and tin all the wires ready to do it.

More-Shiny.jpg

A weekend of Wiring

I got on with the wiring this weekend, as there’s plenty of it on a car with a computer controlled engine. I wanted to finish off all the wiring that I could for inside the car before I moved on to the engine loom. I had decided to fit a delay relay to the courtesy lights, which meant that I had to re-wire the circuit as it used the earth as a switch as well as a supply. With that all done and tested I moved on to the indicator circuits. There was so little draw from the LED’s I needed to fit resistors to get the flashers working. They are quite chunky as they have big heatsinks so I fitted them in the gap next to the air vents where they could be screwed to the body to help keep them cool. Resistors.jpg 
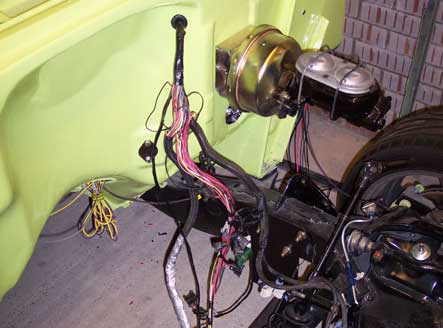
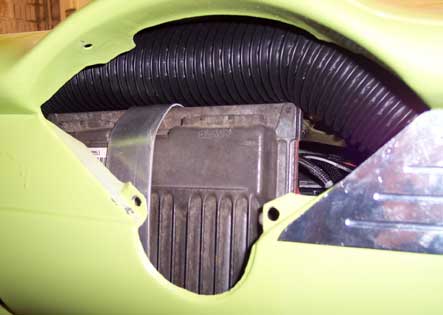
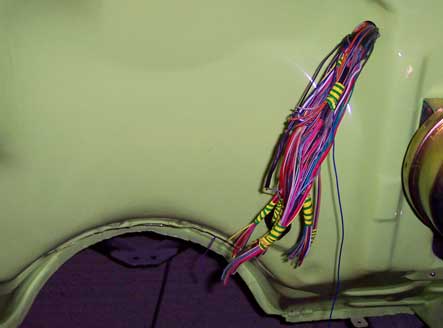
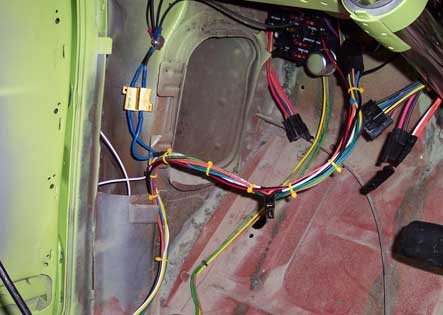
It was then on to some additional wiring. I ran switch wires for the fuel pump and the amplifier power up relays in the boots. The battery is going in the boot so it will be supplied from there too. I fitted a 30A breaker to cover both circuits and left it all loose for now until the battery is in place. Next was a relay to do the neutral start switch and supply a signal to the PCM to indicate if the car is in gear or not and control the idle. It also has a two way brake switch that supplies power to the torque converter clutch which I fitted. With all that done, I sat back and realised I’d done all of the wiring I needed for now and could move on to the PCM loom. I planned to use the hole from the wipers to feed the wiring through, which I’d checked was wide enough for the wiring. It wasn’t big enough to get any of the plugs through, so it was either make a bigger hole or cut all those wires. I grouped the wires by colour so that I could solder them back together easily and cut it all. Gulp. Plenty of soldering for me to do over the next few weeks! Ooh-Eck.jpg

More Wiring and Some Shiny Bits

It was a nice winters day here on Saturday, so I got the car out to give the garage a sweep out and turn it round. It’s great seeing it out in the sun and it gives me a real boost to get it done. While it was out in the open air and easy to work on I shimmed the boot hinges to get it to sit a bit better than it had been but it needs to be a different shape to fit perfectly. The newly cleaned up lock mechanism works properly but I wont tighten it all down till I do the boot seal.

out-in-the-sun.jpg

While it was out on the drive I got the bumper down from the roof and dug out the bolts for it. After giving it a quick wipe over I bolted it on the back of the car and took the old number plate lamps out and fitted the new Danchuk ones I had. With them in place I could finish wiring the back of the car so that I would not have to wheel it out to finish it. A quck test to check they both worked and then some more wiring for the tank by putting a plug on the wires and connecting the fuel gauge. A quick check that it ran as well and I was done for the night. Looks like a real car from the back. Sunday I got on with more wiring and did the courtesy circuit and switches along with the wipers, column and AC power relays. Not much to look at for that but a load of progress too.

Looking-Good.jpg