Car Leaves Garage

Zane rang me a week or so ago and told me he was ready to take the car. I was pretty much ready to go and just needed to empty some of the spare parts and boxes out of the car. With it all stacked up in the garage, I pushed it out into the daylight and waited for Zane to turn up with the trailer.

Off-She-Goes.jpg

I had to take some pictures as it left the garage for the first time in nearly four years. For all the faults I have with it, it looked superb on the trailer. I felt really strange seeing it dissapear up the street, but it’ll come back pretty much ready to test drive. I’ve been to look at it since it’s been there, and the exhaust is looking good. I’ll take some pics once it’s all done. The driveshaft turned up as well, so that’s the last of the drivetrain ready to go. Should be back home in a week or so.

Rear-Exit.jpg

Getting Ready To Go

I spoke to Zane in the week, and he told me that he may be ready to do the car this week. I decided to finish up putting the front end on, and do a couple of bits and bobs while I was at it. The grille needed to be on so that Zane can measure up to weld the tabs on to the radiator for the AC condenser. I gave it a quick clean but it’s quite badly pitted in places so I’m not sure if I’m going to replace it at some point. While I was at it, I got the front bumper down from the roof, and gave that a wash over as well. It’s pretty rusty in places, but is in good condition overall. I gave that a quick going over with a scuff pad and it’s cleaned some of it up but it doesn’t look great up close.

Bumper-On.jpg

Both headlights had broken tabs for the surrounds, and at some point in the past they had been drilled for really long screws. After a lot of checking and double checking I put the seals on and screwed them into place to stay. Next was the passenger side wing. It took a lot of messing about and shimming to get it equal top and bottom on the door edge, but it’s a few millimetres too far forward now. I need to get someone to push it back while I tighten it up, but it’s fine for now. A quick tidy up, and a real struggle to push it back up the little ramp into the garage and I was done. I put a cardboard barrier against the wall, and gently pushed the bumper tight to it. I was convinced I’d shut the door with both bumpers on before, but as I closed the door it hit the overriders and kept the door open a few inches. After a bit of thinking about it, I took the overriders off and the door shut fine thnakfully. Looks better every week to me.

WhooEeeeLooksGood.jpg

Get a Shift on

The car is due out to have the exhausts done in a few weeks so I wanted to get as many little bits and pieces done so that when it comes back it’s almost drivable. First on the list was to finish off the brakes. I had run all the lines and bled the fronts, but the rears needed a mount for the flexi and bleeding. I cut and shaped one out of a piece of aluminium, then bled it all through. I was not happy with the amount of flex in the firewall (the raingear wipers need you to remove one of the braces) tho, so pulled the column down to see what I could do about it. I decided to make a rubber filler piece to take up some of the slack at the front mount and after a bit of trimming and testing it ended up a lot better.

Shifter.jpg

Next on the list was fitting the shifter. I’d put the cable on a few weeks ago, but left it coiled up under the car. After working out roughly where I wanted it to sit, I drilled a pilot hole and checked it from both sides just in case. I took it out as big as I could go with the drills I had, then finished it off with a burr before bending it at an angle for the cable to run in. With it all fed through, a few adjustments and it seems to work perfectly. I decided to finish off the dash then, so fitted the new control arms for the heater controls and filed it all down a bit so that it worked smoothly. After checking it all went together, I took it all to bits again and fitted it in the dash along with the wiring. A quick double check that everything cleared the wiper transmission, and I fitted the glovebox while I was at it. The only thing left was the clock, which had been replaced with a picture of Jesus and Mary dated 1971 on the back. It wouldn’t fit now, as the PCM is behind there, so I cut the casing down and sealed the back up so I could run a bulb to it. With it lit, it looks terrible so it went in unlit in the end. Looking better all the time now.

Dash-Is-In.jpg

Truck Gets a Hammering

The truck’s been sat outside the house under a tarpaulin since the start of August, and it’s booked in to get media blasted and painted with sealer next week to try and protect it a bit. The guy from the bodyshop that will be doing the work (same one that did the Camaro) reckoned the hood was a goner, and after lots of hunting for a replacement, it seems another one will be extremely expensive by the time you factor in shipping. I wanted to see if I could get the hood back to its original shape before giving up, so pushed the ’55 outside and took the hood in to work on.

Beaten into Submission

A few hours of hammering and shaping later it’s an awful lot better. It still needs a huge amount of work to finish, but at least it’s back to being hood shaped. I’ll get it blasted along with the rest of the metalwork and see what they say once they have it clean. Can’t wait to start on this now, should be a really good project. Just need a load more space, and about ten times as much time. Can’t see either happening tho!

Almost Hood Like

Horn of Plenty

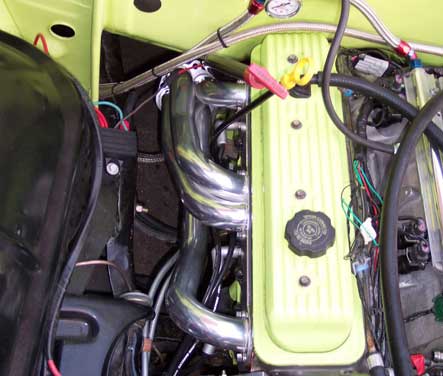
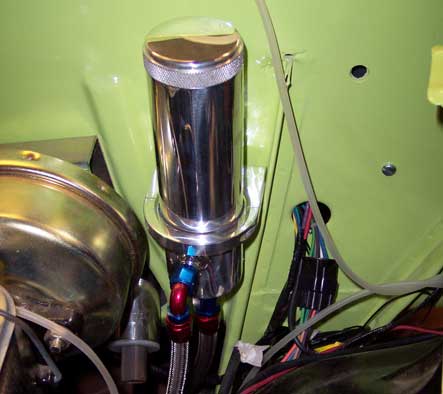
I only had a few hours on Saturday, so the plan was to drill the holes for the power steering reservoir and test it with the engine running, then hopefully get some more time a bit later in the night to do some more. With the reservoir mounted, I filled it right to the brim ready to fill the empty pipes, then got the engine ready to fire again as I have now fitted the new street and performance headers. I’d welded, painted and fitted the steering linkage one night in the week, so it was all going in hopefully to stay. I pulled all the plugs and re-gapped them for the blower and the MSD, and tightened up the headers and moved a few cables that were now in the way with the new run. A quick double check, then check again, and it was ready to fire. It started easily as it always does, and sounded superb. Power steering works as expected, and no leaks that I can see which is good. A quick top up of the fluid and thats another one off the list.

Shiny-Header.jpg

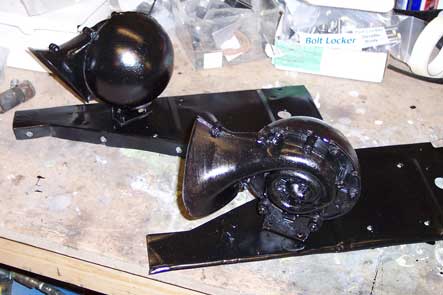
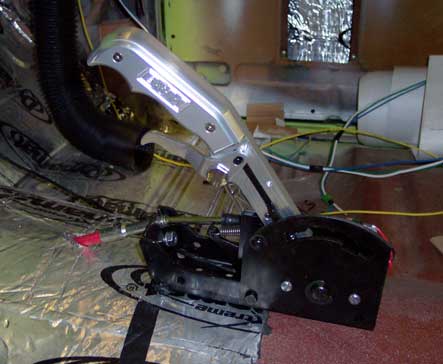
The next thing I wanted to do was the horn button. Easy eh?. I put the assembly back together and tested it, and there was no way to get the signal from the Flaming River rack to the button. I left it and went and had my tea, then went back out to have another quick look at it. I ended up drilling two small holes and soldering a wire between the two so that the button on the wheel would work. A quick test fit, and it didnt work, which I convinced myself was a bad earth, so tightened the centre bolt. It was then I realised I’d put the spring on the wrong side of the contact plate and it was pushing it away from the contact. The wheel was on solid, and I had no puller. I yanked it, tapped it gently, and tried to use the screw holes in the wheel to get it off with no luck for 4 hours. I was desperately trying not to chip the paint, but it wasnt budging. After bending 3 or 4 bolts trying to shift it, I cut down a bracket by hand and filed it to make a puller and off it popped. I re-made the wire just in case I’d broken it, and fitted it this time making sure it worked properly before tightening it down. It was now 2am and I was knackered. Sunday I wired up the horns themselves, which sound great and had a massive tidy up before working on the F100 which is off to be blasted tomorrow. Funny how the easy jobs can take so much time!

Dash-Is-In.jpg

Fluid Lines Aplenty

I took the rack to get the fittings measured a week or so ago, and got braided hoses so that I could plumb it all in at the same time. I re-fitted the rack with the new fittings in place, and connected up the hoses which was a real pain to do due to not being able to reach the pump easily and struggling to line it all up. I wasted a good few hours getting it all right but it’s now ready to screw to the firewall and fill up with fluid to see how many leaks it has. PS-Tank.jpg 
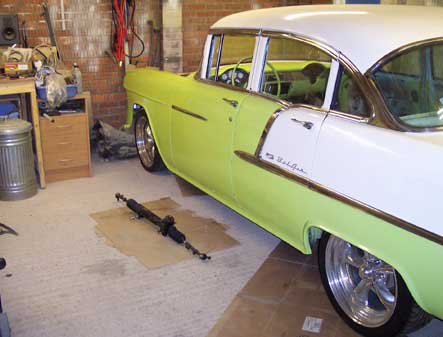
Next was making the cooler lines for the transmission. I’d also forgotten to put the fittings on the box, but got the old ones out and the new ones in without too much hassle. I made one of the lines, then spent the next hour trying to get the angle right to connect the fitting on the box. When I finally got it right, I made the other line to match, and spent another hour trying to get that one right as well. Doesn’t seem to be much done, but it took a lot of time. Oh and the new headers are here, so the car’s ready to go to Zane’s for the exhaust. Trans-Cool-Lines.jpg

Get your Rack Out

The garage was in a complete state from running out of time to tidy up the last few weeks. My plan for this weekend was mainly to sort it out, then get on with a few little jobs. I ended up having to do some jobs on the Camaro first, so had a quick test fit of the radiator to see if it would still fit with the intercooler plumbing. It didn’t. Not the end of the world, I just need to get angled outlets welded on so not too bad. I spent a few hours on Sunday going through all the boxes of bits from the F100 and deciding what to keep and what to junk, then packed it all up in boxes to put in the shed. That left a load of space free, so I moved all the bits around so that I had plenty of space to get around the car.

Tidied-Up.jpg

The prop yoke would not engage on the gearbox, nor would it go into any of the spare ones, so I removed the UJ’s so that I could work on it easier then gave it a good clean up and greased it. With that all done it fitted without any more hassle so I could measure up to have the prop made. A quick check of the axle joint and that has a different size UJ mount. Better get another one of those as well. With that done, I got the front up in the air and climbed under to swap out the gearbox mount with the new one. The old one was a temporary cut down one, so it took a little bit of maneuvering to fit. While I was under there, I pulled the rack out so that I can get the fittings measured. I also worked out where I was going to mount the power steering reservoir and measured up for the pipework. Not much else to report, waiting for the Street & Performance headers to arrive so that I can get the car to Zane’s for the exhaust.

Engine Runs on The Supercharger

I didn’t get much time on the car last weekend as I ended up fixing my neighbours stretch cadillac. I managed to do some more test fitting of the hoses, and realised the planned route for the outlet of the Procharger was in the way of the radiator hose. After a few more goes I managed to get a route that went over the radiator hose, but I needed a few more joiners and pipes. After working it all out again just to be on the safe side, I ordered them up ready for this weekend. The spacer block was also done this week so I was ready to go.I needed to cut holes in the inner wings to get to the intercooler, so I taped them out and rough cut them with a jigsaw. Once I got them big enough to get the pipe through, I connected up as far as the outlet of the intercooler and fired the engine up. There was a loud pop so I shut it back down and investigated. I’d forgotten to take the rubber cap off the intercooler and it had fired it across the garage. Connected.jpg 
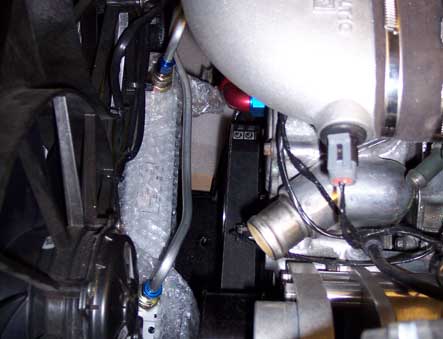
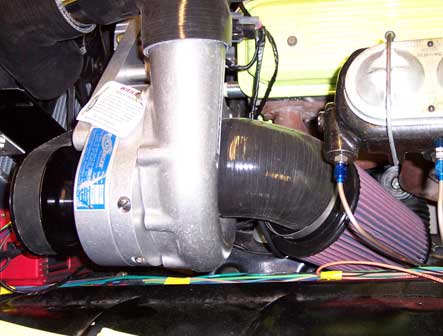
Happy that it hadn’t exploded, I carried on and connected the inlet side. I also connected the blow off valve vacuum so it was ready to go. I’d run out of time, so gave it a real quick test fire. It fired straight up, and idled nicely. The fuel pressure rose as I pulled the throttle, and the blow off valve moved as it came off boost, so its spot on. There was a classic car show just down the road from me on Sunday, so I went down to meet my mate down there and had a wander round the tool stalls. I managed to find some carbide burrs, so when I got back home I pulled all the tubing off again and smoothed it all out with the die grinder. I cut some U channel to cover the edge, and clamped it all back together hopefully for good. While I had the car up in the air I relocated the MSD box to between the inner wing and the firewall, and mounted the fan and headlight fuse box. A quick test fire again to show it off and it sounded great. I need to put all the wiring back again and then the radiator can go back in. Just want to go and rev it up! Inner-Wing-Ole.jpg

Too Many Pipes

I got some of the intercooler tubing delivered this week so the plan was to trial fit some of it and see if it would all squeeze in. Before I did that, I wanted to put the pan back on the transmission after taking it off last week to fit the dipstick. I had a new filter and gasket for it as well, so put that in at the same time. While I had the car up in the air I fitted the brackets and cable for the shifter and left it tucked up on top of the transmission for now till I fit the shifter inside. I also tightened up the intercooler brackets, and re-shimmed the core support to get the wings a bit straighter. With that done it was on to the piping. I did the air filter and inlet first, and after a lot of positioning and re-positioning realised there was no way I could get it back round towards any cold air. I decided to cut down the 90 elbow to allow it to point down under the master cylinder, which should be OK. It’s just balanced there for now but will have a small joiner with the vacuum fittings welded in ultimately. Inlet.jpg 
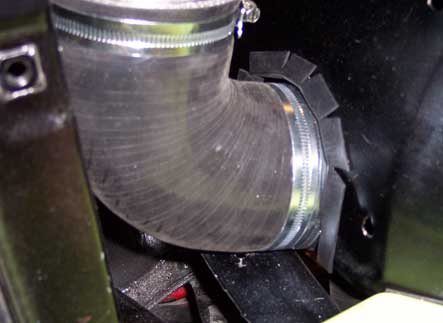
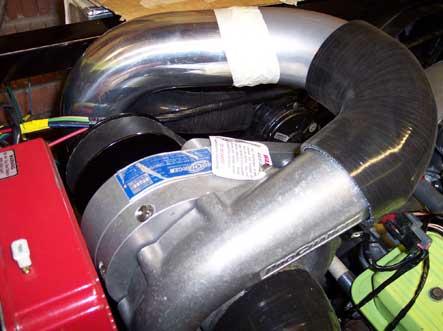
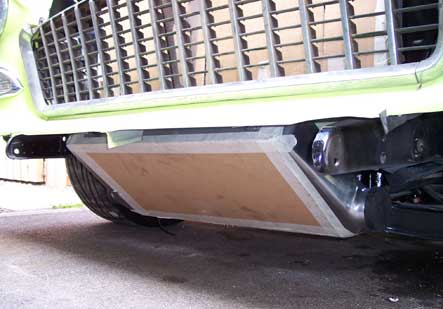
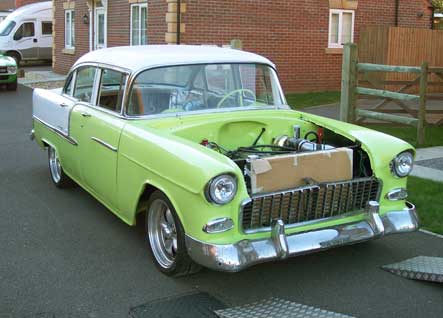
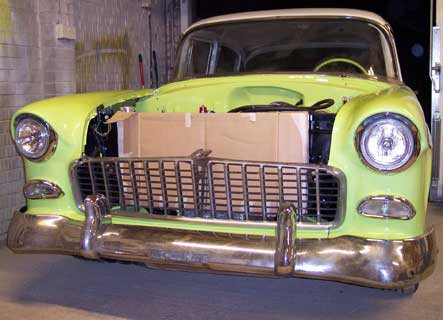
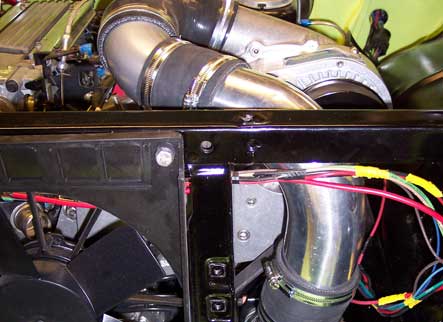
The plan for the intercooler was to go through 180 degrees and then 90 degrees straight up through the frame horns, or just behind them. Unfortunately it ended up too close to the A arms, so that idea was out. The only other option was to come through the bottom edge of the inner wing, so that was what I decided to do once I worked out where the pipes would sit. The outlet from the procharger either had to go across the engine, or go through 180 degrees then down. Also I couldnt get the engine inlet elbow to clear the procharger if it faced towards it so it had to be 180. After much testing and re-positioning I worked out it could either go in front of the radiator, which blocked the radiator hose, or in front of the core support filler panel where the MSD box was. There wasn’t enough room to fit the hose between the MSD and the procharger, so that had to come out. I was more concerned about having the MSD hidden than anything else for some reason. Don’t ask me why, it just does!. I’m still half tempted to run without the intercooler, but where’s the fun in that? Will-fit-with-some-cutting.jpg

Intercooler is in

The plan for this weekend was to try and finish the wiring off and then make a start on the intercooler and other bits and bobs. I had a chunky fusebox for the fans and headlights so that I could wire directly from the battery feed box on the frame. I put it round the back of the wing out of sight, but couldn’t get the drill in so I’ll leave it hanging for now and drill it from the inside next time I have the wheel off. I laid the intercooler out on the floor and worked out how I was going to mount it. I originally planned to make a frame all the way round it, but after getting it in position on a jack and some wood I figured out I could use the grill mounts. I made aluminium straps to mount from them, and two more to hang it from the back of the core support. It’s no lower than the chassis, but it looks really low, will have to see how it survives. I also had to change the vehicle speed sensor plug on the trans loom, so I spliced in the electronic speedo feed at the same time and taped it all back up.

Intercooler-in.jpg

Next on the list was the horns. Neither of them worked, but after a bit of a clean up one of them croaked into life and after a few more tests sounded normal. I blew a load of muck out with the air line, and filed the terminals down to bare metal and got them both sounding good. I gave them a clean up and then tried to get them to fit on what was left of the filler panels. They were too big with the original brackets, so I drilled them off and made new shorter ones from some chunky aluminium angle. They fitted neatly now, so I covered up the filler panels with masking tape and marked the position ready to drill them. With that all done I gave the horns and the filler panels a coat of black paint and left them to dry. The last thing I did was the transmission dipstick, which was a complete pain in the ass. There is no room to see what you are doing, and I couldn’t get more than a quarter turn on a spanner. It’s for a V6 4L60 so needed a load of re-shaping on the bracket but it ended up looking good.

Got-the-horn.jpg