Smoothing the Firewall

Firewall_PS.jpg

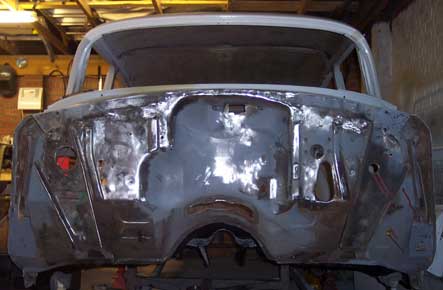
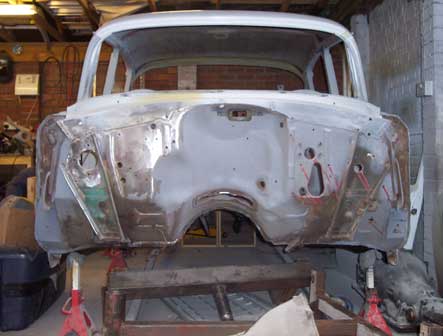
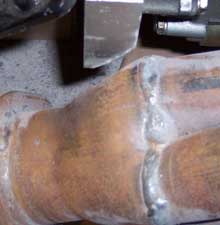
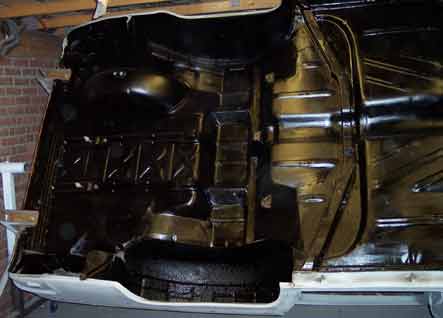
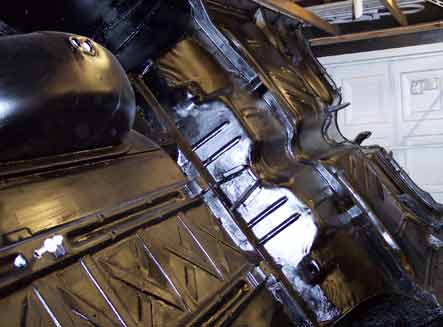
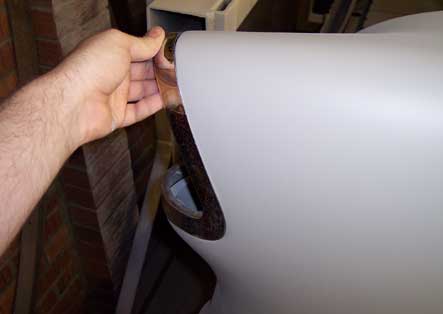
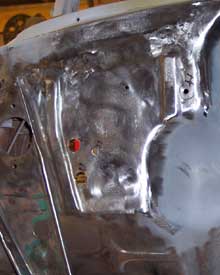
Now that I could get at the firewall I made a start on getting rid of the join along the top edge and a load of the unused holes. I had read that there was tar based sealer between the 3 layers of metal and that it was hard to weld but gave it a go anyway. Before I got the welder out I tried melting it with a small torch, but nothing came out. When I started welding, It spattered and the weld fell off as it melted and burnt the sealer. I worked my way along letting it all burn away and covering me in blobs of weld as I went.

Firewall-DS.jpg

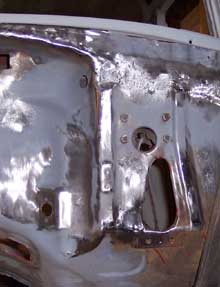
Once I had lumpy weld at intervals all the way across, I went over it with the angle grinder and smoothed it, then filled the joins with weld.With the sealer gone, it welded easily and I filled it all the way along, swapping from side to side to keep the heat down. Another go with the grinder left it all looking good, so I moved on to filling the holes that I dont think will be used. I cut some small patches for the bigger ones and the smaller ones I filled with weld. It looks awful in the pictures, but it needs hammering flat (It was dented before I started) and a very thin skim of filler and it’s done.

Firewall-XL5.jpg

Body off the rotisserie

I painted the living room this week, so didn’t get much time on the car again. There was a problem with the inner wing on the drivers side rear not quite fitting, which I had realised was due to a big dent in the boot corner. I had tacked the inner wing on where it sat, which was wrong, so I cut it back off and hammered it all out properly. It ended up a lot better, not perfect tho. Nobody will ever see it, let alone notice, so there’s no real reason to worry!

Outer-cowl-panel-template.jpg

I had decided to make my own cowl corner panels after getting ripped off by a breakers in the US, so I made a cardboard template from the remains of the rusted out one I had. It was quite an easy thing to make, at least in cardboard, so hopefully wont be too hard to do in metal. With the underside all done, the firewall was the next thing on my list, and the only way to get at it was to take it off the rotisserie. I hooked the engine crane onto the rotisserie hooks at the front then slowly pulled the front of the rotisserie apart. Once it was out of the way, I dropped it onto stands for the first time in a long time. Bit of a milestone for me, but now lots to do.

Shes-on-the-stands.jpg

Tighter than Tight

Tighter-than-Tight.jpg

I tried to fit the pump at various angles again and managed to find one that would just about fit with a few mm of clearance between the hoses and the mounts. Just to double check it all, I decide to fit the headers only to remember that they fouled the starter. A quick two minutes with the grinder gave a decent gap between the two and should help keep the starter from getting too hot. Once the headers were fully bolted up I checked the inlet line and moved onto the hard line.

Headers-Clearanced.jpg

I taped the filter on where I wanted it to be and straightened up the fuel line to fit it to the side of the frame. I realised it was impossible to cut the line accurately as the tank bolts to the underside of the body so I left it where it was and moved onto the brake lines. I started off at the front and fitted the nice anodised ends and T’s I bought from Speedflow then moved to doing the rear axle.

Brake-Line-Fitting.jpg

Once I’d finished the rear line, I set about cutting off the shock bar that I’d welded on a few weeks ago. I carefully cut through the welds with the air grinder before splitting it with a hammer and chisel. Once the bar was off I cleaned it all up, turned it round the RIGHT WAY and welded it all back on. A quick clean up of the welds and I called it a day

Shock-bar-done-right.jpg

Making a start on the Plumbing

TheDemon.jpg

I bought all the connectors and pipe that I thought I needed to do the fuel and the brakes on the car, and made a start on it on Saturday. The plan involved changing the Holley over to a Demon carb that I had won on ebay ages ago. The carb swap was easy, although I had forgotten a connector tube, so I started on the pump. Unfortunately the outlets fouled the bodywork, so I took the pump off and then to bits to try and find a better angle. After about half an hour, I realised there wasn’t one and the only way the pump would clear would be to put the braided hose adaptors fully into the pump, but I could not get them anywhere near. I packed in for the night and decided to have another go on Sunday. It got no better then, as I discovered I’d oredered the wrong hose ends for the brakes, and forgotten one hose completely. I made up a small pipe to fit the carb, which took me about an hour of stabbing myself in the fingers with the braid, then made a few test ends with the tube flaring tool. I also swapped the end of the fuel tank pickup so that I could put braided hose on there as well. Doesn’t look like I’ve done much, but it took long enough. I’ll order all the missing bits tomorrow.

Underside Undersealed

More-Boring-Black.jpg

I Spent Saturday tidying up and re-wiring the garage so that I had some double sockets on every wall. I wheeled the frame and body outside, so I had the opportunity to swap the rear spring shackles over for the original ones as the ones I had put on were for a 57. this gave me a bit more clearance on the springs, so I can measure for the replacement rear wheels. After I had mowed the lawn on Sunday, I got on and painted the underneath with flexible underseal. As I painted it, I found a few bits I’d missed, including a big dent in the inner wing edge, which I will need to hammer out and weld to stop the wheel well flapping. I must have looked at this a hundred times, and not thought about fixing it at all. I did two other little welds and called it a day.

Underside-Sealed.jpg

And now, the other side

Drivers_Side_Rear_Primed.jpg

On Saturday I sanded all the filler primer on the passenger side down with 320, then wet sanded it with 600 then 1200 before drying it thoroughly. I had to fill a few tiny spots again, so I sanded those down and then shot filler primer on, this time with lots more thinner in. Much better result, nice and smooth. On Sunday I quickly sanded these areas, before turning it over, wheeling it out and turning it round to do the drivers side. This was very orange peely, so I sanded it all over with 320, filled a few more bits and shot it all over with filler primer again. Apart from running out of paint, this was completely painless. Fingers crossed I’m getting the hang of it now. Pictures of grey panels arent very inspiring, but here you go anyway!

Boring-Grey.jpg

Back to Sanding and Painting

Passenger-Side-Primed.jpg

On Saturday I had a quick tidy up then spun the car over and started working on the passenger side again. Bob came ober to see how it was going, and after chatting about the starter and motor I decided to fire it up again. I wired the MSD in, poured some petrol into the carb, then fired it. A few pops later and a little fire out of the head, and it nearly went. Bit more fue, and it coughed a few times. The starter disengaged like it should, and I called it a day on firing it. Back on the sanding, I ended up doing about 20 or so little patches and a couple of big ones that I was not happy with. It’s funny how much I’ve learnt since I started doing it, and how a lot of it I can do better now. Good practice anyway! I etch primed the bare metal and called it a day. On Sunday, I spent ages filling and sanding before a few small patches of etch and two coats of filler primer. The rebuilt fin seems to be the right shape for the lights too. All going well, and my painting is improving slowly.

Rear-Fin-Rebuilt.jpg

Steering back in and Starter Sorted

ComingOn.jpg

I had been struggling to get the starter to disengage, and while spinning it over I noticed the flex plate seemed to be bent or on the crank wrong. On Saturday I split the engine and box and pulled the flex plate off to check it. It seemed to be completely flat, so I tried the spare one I’d bought for the 400. That also seemed to be running out as well, so I put the old one back on and torqued it up. After a lot of looking at the starter, I realised it was not disengaging as it’s not supposed to until the engine starts. I put it all back together and packed in for the night exactly where I’d started. On Sunday I hung the 605 steering box and roughly set the track rod ends, then filled the motor with oil and stuck the leads and plugs back on out of the way. Starting to look like a car again.

LooksLikeaCar.jpg

Motor and 700R4 in

FrontOutside.jpg

It was way past time for a big tidy up in the garage, and my 700R4 gearbox had been dropped off in the works van leaving even less space. I flipped the shell back over and out into the sunshine, then rolled the chassis out on the new wheels for the first time. After sweeping up, I cleaned out the sump, and put it on along with a fresh oil filter. I swung it off on the crane, and lowered it onto axle stands then fitted the flex plate. I had a second hand torque converter that I bought, so I washed it out with fresh fluid before fitting it. Once the box was bolted to the back I rolled it all outside on the crane ready to drop in. The front is so low now that I couldn’t get the crane under! I had to jack it clear, before covering the chassis in the pillows that the 700R4 came packed in to protect the paint. The engine dropped right in, and it took me longer to get the bolts on the transmission mount than it did to fit it. A final tidy up and I was done for the day.

MotorBackIn.jpg

Motor Polished and Roof Painted

RoofWhite.jpg

I had a few hours free the other night, so sanded the roof down ready for painting in white. Once it was all flattened I washed it off a few times, then wiped it with a tack rag ready to paint. I sprayed it and made a poor job of it, so left it to dry. The next night I sanded it smooth again, then re-washed it all and had another go. I did a much better job of it this time, although there is still a few patches I’m not happy with, so I may sand it and re-do those. Practice makes perfect and all that. I bought some metal polish as well, and set about cleaning the manifold and supercharger ready for rebuilding. It’s in a sorry state, and in places is very badly pitted. I wet and dried the worst of the scratches, then polished it all for a few hours. It looks much better than when I got it, so I’m happy with that. My daughter poppy wanted to help me put it back together, and was very impressed with the “blue glue” liquid gasket. She got bored when it got too tall to see what was going on, so left me to finish up. I think it looks great, but im biased.

OoohMotor.jpg