Hey, that looks like a Car

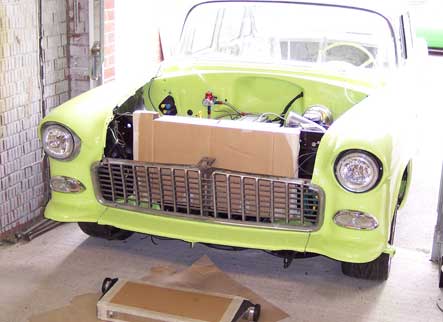
I was on my own this weekend from Friday onwards, so I made the most of it and got some serious car time in. I started off with re-tuning the engine for the new injectors. I’d guessed the numbers based on some numbers I’d found on the net, but it fired up and idled straight away. It’s pretty close, but still rich. I’m not too bothered about that as I’ll be needing it rich once the blower is on. With that done I got the rest of the relay board wired up and roughly cut to length ready to fit. I needed to fit the front end to finish the wiring and run the lines for the trans cooler and stuff, so I got it all down from the roof. A few hours later and it was all on roughly and suddenly looked like a car. Apart from chipping the door edge by opening it without thinking to get my phone from in the car it all went well. I ended up re-hanging the drivers door to sort it out.

Front-End-Together.jpg

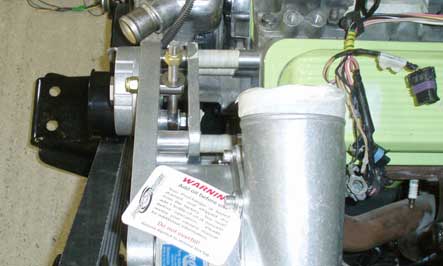
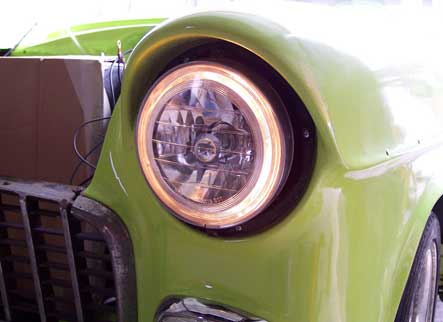
I glued the seals on the back of the parking lights and sealed them up and called it quits for the night. Next morning I fitted them, and got the old headlamps out to fit the new ones. They have two bulb holders for the parking lights, so needed re-shaping to get them in, and the backs of the buckets needed cutting off as well. I wired them all together and tested them on a battery before putting them all back in, and they are extremely bright when your looking straight at them. They have “halo” rings round the outside for a side light, which I love the look of. I put white and orange LED panels in the original parking lights, which I didn’t like when I tried them with the halos. I may just disconnect the white LED’s. I needed a few more plugs to finish off the wiring, so left it for now. I moved on to the procharger bracket next, and marked and drilled holes for the coil pack. I temporarily fitted the procharger too, it’s getting tight in there. I also cut the front filler panel centre support bracket to fit the big intercooler that I have. It will sit at about 20 degrees or so from vertical when it’s in place but it sits higher than the chassi low points so shouldn’t get eaten by speed bumps. Need to work out some brackets for it next, the less visible the better.

AngelEye.jpg

More Wiring and Stuff

I plugged the laptop in and checked the throttle position sensor voltages in the week, and they were indeed wrong. I pulled the sensor off and filed the mounting holes slightly so that I could adjust it. A few quick checks, and an adjustment of the throttle cable gave me the correct readings for closed and full throttle. It was late at night when I did it, so I had to wait till the next day to test it and it ran and returned to idle with no problem. I noticed that the number 3 header tube was cold tho, so I had a misfire to trace. I pulled the lead and put a spare plug on and it sparked with no problem, and the injector had voltage when it should do. I thought it may have been a dodgy plug lead, so I decided to fit the MSD before I went any further. It fitted neatly on what was left of the fileer panel so I drilled it and bolted the MSD in place.

MSD-in-place.jpg

I turned the inlet and MAF round at the same time, and wired it all to fit. Once it was done, I fired it up again and still had no number 3. I swapped the wire out even though I had checked it once, and that made no difference. The only thing left was a dodgy injector. I disconnected the fuel pump and started it up to drain the fuel pressure, then pulled the rails. It was still full of fuel so was a messy job. I swapped 1 and 3 and the problem moved with it. So one of my brand new spare injectors is duff. I had a set of 19lb (they shoudl be 24lb) or the 42lb ones for the blower. I swapped the 19’s in temporarily and re-flashed the computer and it fired up no problem on all 8. I was concerned it would get lean, so I wasn’t happy leaving those in. I swapped in the 42lb ones and re-flashed and could not get it to start at all. Got a few impressive fireballs out of the headers but that was it. I disconnected the pump and it ran till it drained the rails, so it was still overfuelling. I need to find the correct timings for the new injectors as they are super fast ones, so more research needed. Apart from that it was more wiring, this time the neutral start switch and reversing light. I’d forgotten a relay so will need to wire that up as well. Coming on though.

It Runs!

I made up the last hose in the week, and poured in a load of fuel to test the pipework. A few leaks from loose joints but no real dramas. I set the regulator to 40psi to get me roughly where I should be to start it and called it quits. I only had a few hours to work on the ’55 on Saturday, so I built the coil unit up with the new module and the MSD coil I got off eBay. It needed drilling out to suit, and I mounted it where it sits on a stock LT1 for now so I could test it. I fitted the elbow, MAF and an air filter and realised it was ready to go. I got in and fitted all the PCM fuses, connected the battery and flicked on the ignition to make sure it all worked. Nothing. No fault light, no fuel pump noise. After a lot of testing I found that I hadn’t connected the earth for the fuel pump relay, and after a load more testing realised I hadn’t put the feed fuse in. Lotsofbitsfitted.jpg With that fitted, I turned the key and the pump buzzed into life. I pulled the fuse back out and spun it over on the starter till I got some oil pressure, then re-fitted the fuse. I was really nervous, and turned the key to start. It fired immediately and ran for a few seconds then died. I was out of time then, but managed to get a few more hours later to have another go. I pulled the MAF plug and gave it another quick go and it ran much better but stalled on returning to idle. You can see a video of it here. I temporarily spliced in the ALDL plug and checked for fault codes with a laptop. It was showing a knock sensor fault, so I checked the wiring then realised it had a Caprice program on the computer which is a 2 knock sensor car. I re-flashed it with a stock Camaro one on Sunday, and fitted the headers and the radiator to check for clearance for the pipework. A quick test fire and it ran like a watch with the MAF connected. It still stalls on return to idle, so I need to check the throttle position sensor is correct and go from there. Pretty chuffed with it all tho. RadPlaced.jpg

Sorry State

The truck sat in a warehouse getting dusty for a long time, then the warehouses were getting knocked down for a new housing estate so it got moved to another warehouse where a lot of vintage Jaguars were stored. One Sunday night, a gang of teenagers broke in and smashed up all the cars, driving them into each other and setting them on fire. My truck got wheeled out, the hood got thrown on the floor and driven over. For good measure they crashed into it a few times as well. As it was there as a favour, it wasn’t insured in any way, so it’s down to me to repair it.

Out in the Open

I couldn’t bring myself to go and look at what damage had been done to it, but a friend of mine who is a bodyman offered to look at the damage and give me an opinion as to if it was repairable as a favour. We drove down, and found it sat outside, where it’s been for the past few months it turns out. Bare metal and British weather don’t mix that well, and a lot of the spares in the back were now well and truly rusted too. After looking it all over, my mate reckoned the best bet was to try and bend the hood back into some shape first and go from there. There’s no way I’m leaving it out in the open in the middle of nowhere, so it’ll have to come and sit on my drive for now. Luckily I was in my old Volvo estate, so all the boxes of parts went in the back of that and will go in my shed out of the way for now. I was gutted to see the state it was in, but it’ll be OK I think.

Battered Hood

Rolling Repairs

With the Camaro back on the road, I started driving it to work. The new brakes at the back squealed really badly, and got progressively louder. I re-bled them which made no difference and after double checking everything got the rear of the car off the ground and took them to bits. They looked perfect, so I put the wheels back on and checked again. The drivers side was wobbling really badly, and after a bit of checking I decided it was another bent axle. I took it to Zane’s for him to check, and sure enough it was. I came home, parked it up and ordered another from Summit. I got new body bushings at the same time, as the ones on the car were well gone, and when I took the car back to Zane’s I got him to fit them for me. The car rides and handles much better now so they were well worth doing.

Chav Buttons

When I got the car back from the repairs, I noticed the plug on the ignition switch was slightly melted. I cleaned it up and guessed that it had been left with the ignition on for a couple of days and left it at that. I then noticed my voltage gauge was showing 12v when running, as was the PCM’s gauge. I checked and double checked all the wiring and couldn’t find out why. Then when I was coming home from work, smoke started coming from the switch. It was too hot to touch, but I had the option of risking it or getting the car recovered back to the house. I decided to risk it, and drove all the way home with it getting progressively worse. I got home, pulled the battery leads and had a look at it when it had cooled enough to touch it. My mystery voltage loss was from the switch which was knackered. I could either get another from the US, or find an alternative. I found a cheesy start and ignition switch panel on ebay and bought that. I took it all to pieces, and threw away the crappy relay and wiring that came with it and replaced it all with decent stuff. I wired two relays in, one for the Accessory circuit, and one for the Ignition circuit. With it all done, a quick test showed 14v at run on the dash gauge, and I think it looks cool. Weird turning off the alarm and immobiliser, then putting the keys back in your pocket to drive tho. Plenty more to do on the car, and no time to do any of it.

Tubular Hells

I didn’t have much time to work on the car this weekend, and the Camaro needed repairing too, so I decided to do some easy bits out of the way once I’d finished. I spent a while polishing up the fuel rails that Zane from Zannetec had welded -06 connectors on for me. This got rid of the ugly factory hose connectors that face towards the brake booster, and allowed me to use a boost referenced regulator rather than one on the rail. With them looking nice and shiny, I cut down one of the hoses that I had from when I started plumbing for the Demon carb and fitted it to the regulator. There are two more to do, one for the rail feed, and one for the return. Note to self, wear gloves when your messing with the braiding or you’ll bleed over your new pipes.

FPR-Pipe.jpg

I also made a start on the brakes, so I re-bled the master cylinder just to be on the safe side, then made up the lines for the front. First pump of the pedal sprayed fluid everywhere from the banjo hose fittings. Guess I forgot to do them up fully tight then. The passenger side one just would not seal, so I swapped it out for a spare one that seems to have done the trick. I gave them all a quick bleed with a tube back into the reservoir on the rear, they hold the car still anyway. I got some more time Monday evening, so made the rear brake lines up, couldn’t test them as I’d nicked a fitting for the Camaro, so will have to do that when I’m out there next. I also ran the feed and return fuel lines in 3/8″ which was not much fun at all lying on the floor in the heat. Done now tho, just need a hose end so I can make the last two hoses and that’s another one done. I could start it if I found the two missing ignition leads then. Gulp.

Spaghetti.jpg

The Key Makes it Do Stuff

I decided to run the main feed from the boot to the starter, so got the car up on stands at the front so that I could get under it. My mate John had given me a load of welder cable to use, so I fitted a ring to the one end and lay under the car to work out the best route to the boot. I also want to run the fuel up the passenger side, so I decided to run it up the side of the frame rail inside. It was an easy job to do, just time consuming. I also didn’t have big enough ‘P’ clips so had to use smaller ones temporarily. I left enough on the end to allow me to move it round a bit and drilled and gromitted a hole into the wheel well and put the battery clamp on. BigBatteryFeeds.jpg 
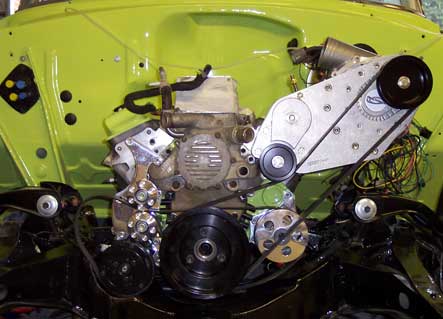
I made a matching one for ground, and drilled a hole through to put a bolt in. I put a strap on the other side and connected it to the frame as well. That was me done for Saturday, so on Sunday I started back on the engine wiring. I decided on a route for the gauge senders and some other odd wires and made off the ends and taped them up into a loom. With the starter solenoid also connected it was ready to see if it span over on the key. I filled it up with oil, poured some over the rockers and pulled out the plugs to give it a go. I turned the key and over it spun. A few seconds of turning over, then a quick check to see if anything was getting hot. The jump leads I was using as ground for the block were hot, so I connected up the bigger ones and gave it a few seconds more. It built pressure to 25psi, so all looks good. It never had a key, let alone a starter circuit when I got it, so I’m chuffed with another little milestone for me. OilSernder.jpg

Shiny bits and Wires

I got a 1/2" NPT tap off ebay so that I could tap out the pressed in hoses on the water pump. I took the smaller one at the back out to the same size and then took the front cover off and set about it with a die grinder to remove the casting marks. With that done, I sanded it smooth and gave it a quick polish. I couldn’t get to all the corners, so some of it isnt as shiny as it could be. Looks way better tho. I cleaned it all out, greased the pump and sealed it all back up ready to fit. I stuck the gaskets on, and did the throttle body at the same time. Was a weird feeling putting it on properly at last. HubbaHubba.jpg 
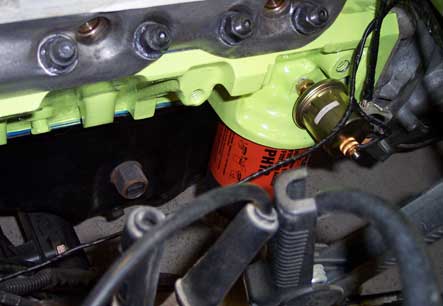
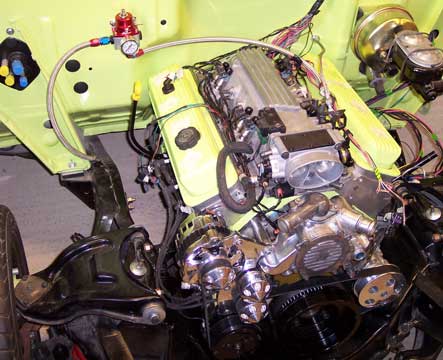
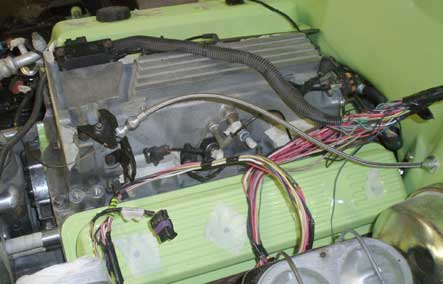
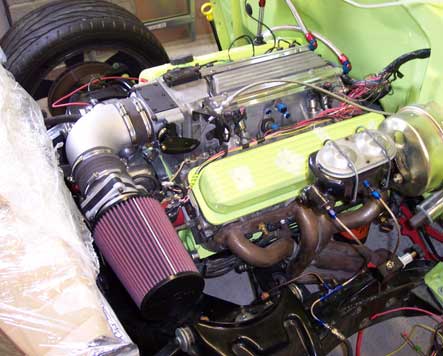
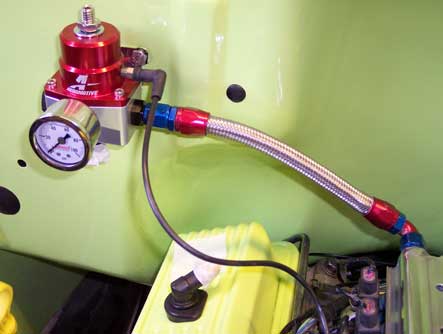
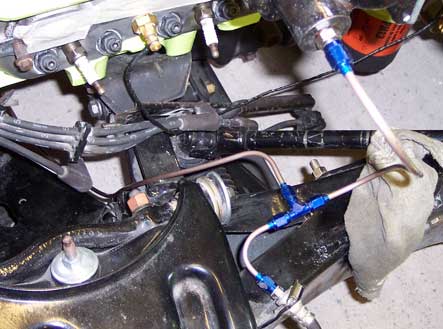
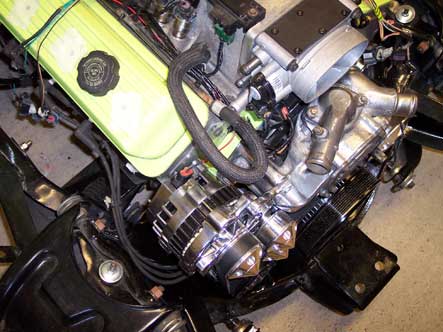
It was an awful day on Sunday, blowing a gale and raining (you’ve got to love British Summers). I pushed the car out enough to get a chair in front of it and settled down for a good few hours of wiring. I got the entire right hand side done (that;s Drivers right, not from the front). I taped up each sensor individually which looks miles better than the flexi tubing stuff. I’d fitted the oil filter and dipstick one evening this week, and put the last of the sensors into the block so I decided to fit the accesories for good too. It looks ace with it all done. I also hung the fuel pressure regulator and stuck some hoses on to take a pic (I know they are on the wrong ports!). Need to finish the other side off and then it’s on to the rest of the wiring and plubing. FPR-in.jpg

Blower in position and Throttle is in

I bought some longer bolts for the supercharger bracket, along with a big bag of washers so that I could get the position right. I taped the washers into three equal stacks, and hung it all to see where it sat. The bolts were a little long, so I chopped a bit off the end of them all and did it all again. After fitting spacing and re-fitting for a few hours I had it all sat where I wanted it and it now cleared the accesories easily. I also had a bit more clearance on the inlet so it should go together without too much hassle now. I taped up the tubing and got the old inlet manifold down from the roof to strip out the fittings.

BlowerShimmy.jpg

They were all filthy so they got dropped into a cup of thinners to clean them up. I also cleaned up the PCV and the throttle cable bracket and fitted those to the engine. I put the map sensor in and then got the throttle cable out to measure up to cut it to length. I drilled the firewall and ran it all through before realising I’d left the spacers that straighten it out so pulled it out and did it again. I lay all the wiring out as well to see what would fit and what needed extending. The entire right hand side will need extending by about 6 inches so thats a job for next week. I’d better order up all the fittings so I can plumb it too.

GoCable.jpg

Engine and Box go in to Stay

I got the engine off the stand and on to the metal stand that I have ready to join it to the gearbox. I then got the gearbox on the engine stand and drained the last of the fluid out before turning it over to have a look. It had been left without the dipstick hole plugged and was full of muck. I cleaned it all out but was a little concerned about the colour of some of the fluid in there. I’ll soon find out if it’s no good once I try driving it. I wheeled it outside and gave it a good clean with the pressure washer. Once it was dry, I brought it back in and bolted it up to the engine ready to stick in.

MotorsIn.jpg

It slid in easily, as it should and it was nice to see it finally at home. I bolted up the AC pump and was a little concerned about how much clearance I had left. Rather than take a risk, I cut the mounting ears off on the other side and ground some of the casing down so that I had much more free space. It seems to hit the brackets as well, so they got a little work on the grinder too before sanding and re-polishing it. I wanted to try and mock up the blower to see if it would clear everything.It ended up way too close to the accesories but needs to move forward another inch or more. It also needs a little clearancing around the water pump, but I need to see where it all ends up. Looks good tho, only real issue is how close the inlet is to the brake booster. May need to be a bit creative there.

BlowerTestFur.jpg