EGR Block off Plates and More Chrome

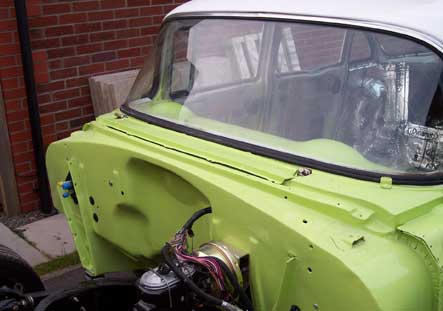
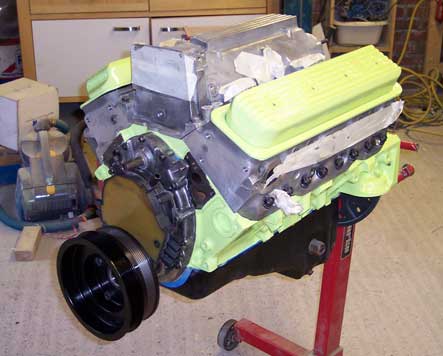
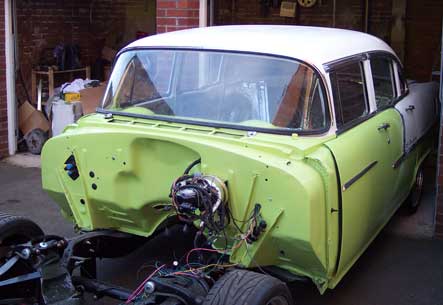
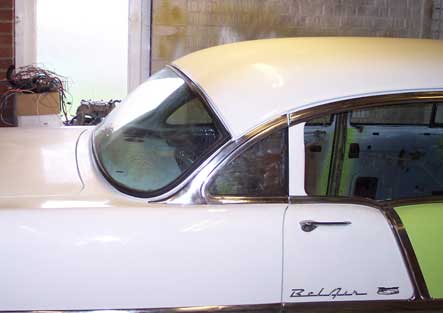
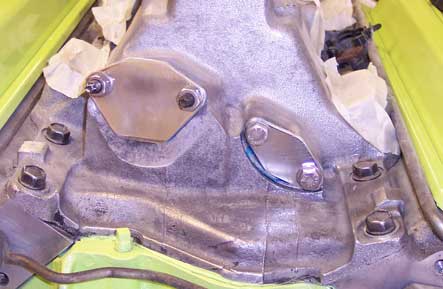
The guy came back and re-fitted the rear screen for me in the week, and then I realised how badly my chrome fitted. It took hours of bending, fitting adn removing to get it OK. I left the front for the weekend and went and had a beer. The LT1 engine has EGR (Exhaust Gas Recirculation) inlets on the back of the manifold that need blanking off, so I set about making some on Saturday. John had given me some flat aluminium bar so I traced out the shapes I wanted and cut it out with the jigsaw before trimming it with the bench grinder. I sanded them both smooth and buffed them too. not that anyone can see them, but I know they are shiney anyway.

egr-plates.jpg

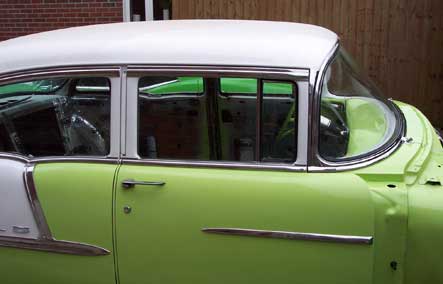
While I had the jigsaw out I cut the winged supports from inside the rocker covers without scratching them luckily. I fitted the gaskets and popped them on loosely for now just to keep the dust out. I had the front screen chrome left to do, which was in a sorry state, so I gave it a good clean and polish and tried to get the worst of the dents out before it went on. After a lot of bending and re-fitting I got that to look OK as well, so fitted the wiper escutcheons too. A quick clean of all the glass and I stood back to look at it and was chuffed with how good it looks. It’s easy to be critical of all the little bits and bobs that need doing, but the overall look of the car is great. Next is to work out what fittings I need for the engine and box plumbing and order that up this week ready to hopefully fit them next weekend. All things being equal the motor will stay in then. Can’t wait to see it in place and get on with wiring and plumbing it.

side-on.jpg

Engine goes Green

I had a day off in the week so took advantage of it and got on with the trim pieces. I took the two that had gone wrong down to bare metal and re-shot them ready to top coat with everything else. I was also having the front and rear screens fitted, and unfortunately remembered the trim clips on the rear after having it fitted. The guy was good as gold and offered to pop it back out and re-fit it another day after the clips were in. With all that done I shot everything white and left it all to dry till the weekend. I gave it all a quick sand ready to paint the green, then put it to one side and made a start on the engine block.

CowlVentFilles.jpg

I smoothed the block out before I gave it to Zane to build, so it needed a really good de-grease and a few small rust spots needed sanding again. With it all done, i dug out the metal valve covers and gave them a good sand and de-grease too. I masked it all up, then gave it all a decent coat of etch then washed up ready to shoot the green. I gave it all two light coats and left it to dry over night. I’d forgotten that the metal covers needed clearancing for the roller rockers, so I’ll have to be really careful doing it or I’ll be painting them again. My friend John Fraser had made me a spacer for the pulleys so I fitted it and test fitted the accessories again. It fitted perfectly, so that’s one less thing to worry about. I need to pull the hose ends out of the water pump before I put it all together finally, so I pulled most of it back off and packed it away. I also wanted to fit the starter, so I shimmed it up and turned it over with a battery. It shot half a pint of oil out from the oil filter mount, so I guess Zane has put oil in it!.

BlockShot.jpg

Sanding and Painting Again

The weather here this weekend was lovely, and I had a few problems with the Camaro that needed sorting before I could work on the ’55. With it done and dusted, and being boiling hot from working on the drive in the sun I went in the garage and started sanding down the rest of the window moldings. I had Poppy and Tommy in and out of the garage messing about too so it was a lot slower going than it should have been. Poppy wanted to sand stuff down, so she sanded the workbench while I bare metalled everything. There were a few dents and dings that needed filling, and the cowl vent needed a few skims to get rid of some low spots, but apart from that it all went well. On Sunday I finished sanding it down, with both kids taking it in turns to pull the trigger on the DA sander.

twounfinishedmotors.jpg

I had forgotten the transmission inspection cover when I did the rest of the car, and this had a thick layer of underseal on which I set about with a hammer and chisel to shift. With the worst of it off, a heat gun and a wash with thinners got the rest off ready to sand it. I had a quick tidy up and hung up the big parts and laid the rest out ready to paint. My mate John popped in on the way back from a car show in his Ford Pop which is looking good. When he left for home I mixed up some etch and poured it in my cheap gun to shoot it. It’s nowhere near as good as my Devilbiss, but is fine for primer. Some of the old paint which I had sanded smooth on two of the trims crazed and will have to be redone, and I found another trim I’d forgotten, but apart from that all painless. Nice to be back on it again.

LotsaGreyBits.jpg

Test fitting the LT1 and Blower

We had been on holiday in Florida for a fortnight, and I got the LT1 back from Zane at Zannetec before I went. I’d test fitted the Street and Performance accessories quickly and found that I needed a spacer to get it to line up before I went away, and wanted to find out if I needed new headers as well. I swung it into place and test fitted the headers which clear the rack but foul the steering joint as I expected. I took a lot of pictures for reference and pulled it back out and put it on the engine stand.

TestingTesting.jpg

I wanted to mock up the Procharger too to see where that sat in relation to the pulleys, so I started bolting it all together. I had a bit of a panic when I saw how big this thing is bolted on, so mocked it up with the inlet elbow and hung the blower as well. As you can see, it’s huge, but there are pictures of one fitted on the Procharger site so I guess it fits. It needed a little bit of work to clear the water pump, but I wont finish it off till I get the spacer made and see where it hits. Looks ridiculous, but should be fun. Once it’s in the car I’ll see if I have enough space for an intercooler but if not I’ll just fit some bends to connect it all together.

Hairdryer.jpg

Back on The Road

With the Camaro back home. I set about the huge amount of wiring that needed doing to get it ready for using again. I decided to change some of it again, and got it tucked up out of the way. I also needed to fit the rest of the Vinage Air AC system so it was starting to get tight under the dash. With it all in I fitted the carpets and the new seat sliders along with the door trim panels. Still needs a few bits and pieces but it’s ready to drive over for the MOT test.

Spaghetti

The drive to the MOT station was pretty uneventful, and I left them to reconnect the hand brake cables to the new rear brakes and got on with work. It passed without any issues but it started to leak from the AC system so once I tightened up the loose joint it was ready to take home. I managed to hit a lorry tyre on the journey and smash the new spoiler off but I was flying to Florida on holiday that evening so I just parked it up and forgot about it for a few weeks. Will sort it all out when I get back.

Looks Good

Shiny Bits

I wanted a custom throttle body cover for the car rather than the stock plastic one. There are plenty of really awful ones available, but I decided that it would be an easy thing to get laser cut or engraved. I drew it all out, priced up getting it cut, and then forgot about it. A few weeks ago I found a company that does custom ones on Ebay, so sent them the design and got 3 of them engraved. A quick trial fit on the spare one I had in the house I love them. The newly painted Camaro will get the first one next week hopefully.

TB-Cover.jpg

It was Poppy’s 5th birthday on Sunday, so it was kids party on Saturday and only got a couple of hours on Sunday. I’m back on to cleaning up the last few bits ready to paint, which are little bits like the inner window trims and the parking brake lever. There’s the bonnet to do as well, but I don’t have anywhere to put it till the front end is built up so it will stay in the shed for now. I put the ipod on random and started cleaning the trims with the DA sander. It was slow work, and some of it was as easy to do by hand. When I got to my third one, I got fed up of the horrid black paint that was on there blocking the paper and had a go with the hot air gun I bought to melt heatshrink. It came off nicely, leaving a dirty stain behind that sands off in seconds, so went through the rest of the trims quickly and will hand sand these down in the week and hopefully shoot some etch on them at the same time.

Trim-Nearly-Done.jpg

It’s Painted

With the body all in primer, and the insides of the doors and shuts painted the body shop started putting it all back together. The replacement doors and wings were not even close to fitting properly, and they spent a day bending and pulling them to fit better. At the end of it all there was a huge gap at the top of one of the wings that they couldn’t get rid of. I went to have a look at it and wasn’t happy leaving it. They suggested building it up in fibreglass, but I didn’t want to botch it, so got them to cut it and build it up in metal. With it built up and filled it looked a million times better and they were ready for the topcoat.

Top Coat

With it painted it looked much brighter than it would once the white stripe was on, as I was convinced it would tone it down a bit. I got a set of Gen 2 bullet wing mirrors off ebay so I got them painted at the same time ready to fit once I got some new rubbers for them. With it all stiped up it looked exactly how I wanted it, and spookily like the version I’d done in Photoshop as a test. I went to have a look at it, and ended up putting some of the wiring back together for them as they couldnt work some of it out. With the batery back on I started it back up for the first time in a long while and instantly got a giant grin.Just the underside to schutz and the body to be wax injected (well it would be a shame to leave it after all the work it’s had done) and it’s back to me to finish the wiring.

Painted in full

Engine is Mostly Built

The LT1 engine that will go in is being built by Zane at Zannetec. It got taken +30 to fit the forged pistons that I got on ebay along with forged rods. The crank is a forged one as well, so it all went out for balancing along with the flexplate and the SFI damper. When Zane got it back he spotted what looked like a crack in the block and rang me to tell me the bad news. I had a frantic scramble around but could not find one in the UK, although I could get plenty in the states. Zane took it back to the machine shop for a second opinion and got it under a magnifier where it turned out to be a casting flaw.

Forged-Crank.jpg

The machine shop re-honed the bores and managed to clean it up which was great news for me. With it back at Zannetec he started putting it all together and after a trip there to drop off the bits I’d forgotten to give him (like the mains caps, oops) he got the short motor assembled and made a start on the heads. They are aluminium Camaro ones with upgraded Comp Cams springs and roller rockers. Should hopefully all be together in the next week or so, as long as a replacement oil pump drive shaft turns up (I’d forgotten to get one with the pump). Can’t wait to get the motor and trans in as I’ll be able to get on with building the rest of the car up. Stay tuned!

Forged-Pistons.jpg

Screens Are Ready to Go In

With decent weather on my side, I pushed the car out and finished off the last of the Dynamat in the boot. I also got the front screen down and gave it a good clean up with a razor blade and thinners. It’s covered in scratches that look like they came from the wipers, and is generally pretty tired. With it as clean as I could get it I left it balanced in place and found the trim for the front. This was in a really bad way when I got the car, and I hadn’t helped by bending it when I took it off. I hammered out the worst of the dents, and gave it all a good polish up. It was completely the wrong shape now as it had been squashed too when I stored it. Theres a lesson for me there somewhere. It took a fair bit of bending and re-shaping to get it to fit.

Screen-Ready.jpg

I lay the screen on my lap and fitted the rubber seal to it then test fitted the trim. With a few more tweaks it fitted perfectly and I put the screen in place ready to have it fitted. I also fitted the rubber for the rear screen and put that in place as well. I havent put the rear trim clips on yet, and I’ve read that it’s better to use more than they supply in a kit so will find the old ones and give them a clean up to fit too. I also put the two rear quarter windows in, so once the screens are in it’s all done. I’d arranged for a car glass fitter to do them both, but he hasnt shown up after I’ve rung him twice. Will find another one who can be bothered to turn up.

Rear-Glass.jpg

Yet More Mat

The weather was dry on Saturday, so out came the car into the sunlight again to get turned round. I fitted the last window channel with no issue apart from cutting my hand. I gave the dash a quick polish with some compound as well, it’s not the greatest bit of paint I’ve ever done, but it’s OK. With it turned round I pushed it back in and measured up the new Optima battery for it’s new home in the spare wheel well. I marked it up and spent an hour with the hammers forming a ledge for the battery to sit on and making it low enough to fit under the floor. With that done, I cleaned it up with the drill wire brush and gave it a quick coat of hammerite. While that dried I got the instrument panel and marked it up for some new LED holes. I wanted to get 3 more LED’s in there, the alarm, the engine management light and the transmission mode switch. The trans light ended up behind the original column shift lens out of the way.

Dashed.jpg

On Sunday I soldered in the LED’s and after a quick test fitted the dash for hopefully the last time. The trim panel that goes on the top of the column is very badly pitted, so I gave it a quick rub over and then used the polisher on it. Looks better but not great. Who cares, looks cool in the car. With that all done I pushed the car out a few feet to get into the boot and made a start on the Dynamat. Lots of curves and corners, so it’s not quick work, but starting to look good now. About another hour or so to finish it I reckon. I need to make a hold down bar for the battery and then I can put a cover over it so I’ll have a nice clean looking boot.

Yet-More-Mat.jpg