Category Archives: F-100

How did I live without…

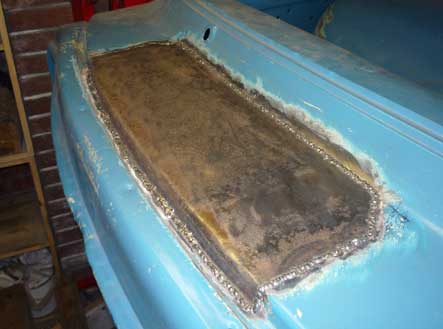
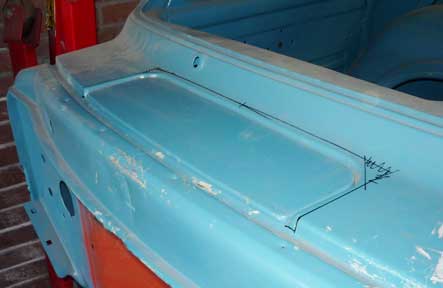
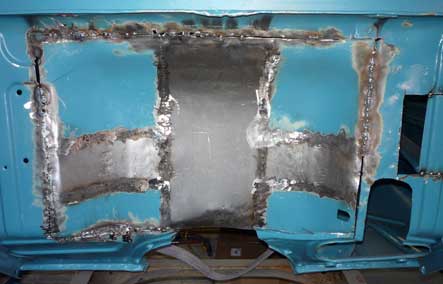
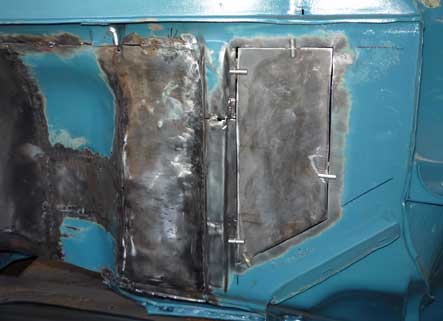
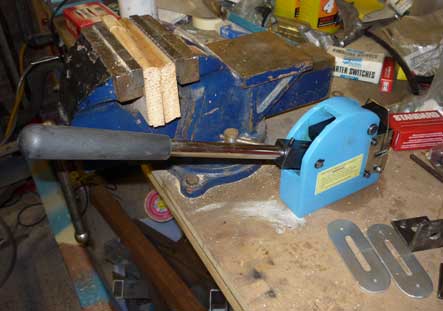
 …a shrinker?. I cut out the cowl vent, and made a cardboard template for the new panel and transferred it onto a piece of the old hood. It curves in every direction, then is straight along the gutter and I struggled to make it even close to being right. I came to the conclusion it was time to buy a shrinker, and got a cheap one off ebay.I got some scrap metal and did a few test shapes and was amazed how easy it was to get awkward shapes made. I immediately thought of loads of other bits I could have used it on so I reckon it was well worth it.

Shrinker

I decided to start again on the front edge of the panel, so bent the gutter back out, shrunk it to match the shape properly, then folded the shape of the gutter back in. I was extremely happy with how close it seemed to be, and after a little trimming it dropped in like it had always been there. I carefully worked my way around tacking opposite sides then waiting for it to cool before joining up the tacks. Extremely happy with how it came out in the end, will grind it out and fill it next week with a bit of luck.

Cowl Vent is Gawn

One Bit Done

I had to do a few quick jobs on the Camaro first today, so with that out of the way I put on the new gas bottle and the spool of .6mm wire that I got in the week. After a few test welds I got the settings about right and started tacking the filler panel that I made last week in. I really struggled to get the wire speed right and kept getting the wire sticking to the tip as I finished a bead and jamming the feed. After doing it 3 or 4 times in a row, I swapped back to .8 to finish off.

Primed Firewall

After a load of dollying to get the original bits roughly straight, I joined up all the tacks and got the grinder out. With it all ground nearly flat I used the DA sander to get it smoother and show up any low or high spots. Another half hour with the hammer and dollys, plus a bit of help from a block and lump hammer and I was pretty happy that it was ready to fill. I plan to get the column drilled and any other bits and bobs done before I get the filler out tho, so a quick coat of rattle can primer will keep it rust free for now. Next up is the cowl vent, but it was getting a bit late to start that, so it;ll have to wait till next time.

NEXT!

More Quiltwork

I started out finish welding last weeks work slowly working from side to side and letting it all cool before doing any more.It was all going well, and I cut the edges of the old pedal hole so that I could bring it intol line with the new panel I’d made. After a few tacks, I bent the floor back in to meet the new edge and sliced up the edge into pieces to tack it at the right angle. With the cab loose, I couldn’t get enough pressure to get the floor back straight at the floor and firewall joint but its pretty much straight on the pedal cover. Just before I did the last inch of seam weld, I ran out of gas. With my welding done for the day I ground down the welds before getting the orbital sander to start getting it all nice and smooth, The sander showed up the high and low spots so I dollied it back into shape as best I could and carried on.

More Wall of Fire

Hard to see in the pic but I’m pretty happy with how it’s come out. I cut out the battered piece the other side of the rib, and cut a new panel out of the old hood. It’s clamped in ready for when I get some more gas. I wanted to see where my ebay purchased pedal bracket would end up sitting, so after a bit of measuring I trimmed it to fit around the Camaro chassis leg and put it inb position. I’m a bit worried about getting the exhaust through right next to the brake master. Will have to get the proper trans in place and see how much space I really have. I’ll probably chop in a piece of thick wall tube to give the exhaust space to pass by. Will have a think about that for a while.

Brake Bracket

Patchwork Quilt

I pulled the cab off the frame, and lifted it up and back so that I could work on the firewall again. I decided to slice it all back out and start again as it overlapped instead of butted in places. After a lot of work it ended up a lot neater on the left hand side, and I started slicing up the bottom edge to try and bring it back in but keep the shape of the stamped ribs on the bottom edge. It ended up like a little shelf, and I don’t like the way it looks so I’ll do it again I think.

Left Side

While I was looking at what i could do to the right hand side, I decided I hated the way it was hacked about for the brake booster and the column, so cut the booster mount out and trimmed a spare bit of ribbed firewall in its place to bring it back to how it should have looked. With that tacked in, I drew a square to cover the column hole and cut that out as well. After a lot of measuring and re-measuring, I cut a replacement piece, then shaped the curve at the bottom and the flange to match the edge of the pedal hole that was missing. Hard to see in the pic as the part on the left is bent down, but it’s not too bad at all. Once that’s all in I’ll chop out the other badly repaired bit on the other side of the rib and carry on with my patchwork quilt!

More Wall of Fire

Door Edge Again

I decided to get rid of the original core support and crossmember as it wouldn’t fit the bigger radiator I got for free from a BMW X5. I levelled the front, then put the front wings and hood back on and took a lot of measurements. I made temporary wing supports out of wooden blocks, then cut it off where it was welded to the Camaro clip. I need to order up some box section to make the replacement now that I have a plan in my head as to what to do.

New Hood on Wood

I decided to pull the drivers door back off and cut the rotten parts of the bottom skin out. After a while with the grinder, I found the whole bottom of the door was as rotten as a pear. It’s too much to patch in,so I need to get some patch panels. After re-tapping the door hinge mount plates, I hung the door properly and found out the new edge that I made wasn’t as good as I thought. The gap ran out towards the top, and after thinking about it for a while, I cut it out and set about making another new one. The old hood became a sheet metal donor and after a few hours work I had a nice even gap. My self darkening mask had gone flat, so I had to use the old mask and I wasn’t happy with my welds, so I’ve left it to finish another day.

New Door Edge Again

Truck Gets a Better Hood

I’ve still been working on the truck, just haven’t updated the site in a long time. I finally got the drivers side rear cab corner in decent enough shape to skim with filler. I also made a start on trying to sort the door out. It was a completely different shape to the frame at the back, and I decided to hacksaw through in a few places and bend it back. With a few tack welds in place it looked a lot better than before. The front edge of the door frame was also a different shape to the screen frame. After a lot of thinking, I decided to slice it off and make a new one from sheet metal.

As it sits Today

It took a lot of measuring and messing about to get it close but it should be a lot better once the door is re-hung. While I was at it I filled the mirror slot in the door. I’m getting a lot happier about the way it looks now, but I’ve got an awful lot of work still to do. I found a hood in the UK that had been replaced for a better one. I emailed the owner, and sent him a pic of mine and asked if it was in better shape than mine, which he reckoned it was!. I got it collected, and with a bit of help from Tommy got it balanced on the body for a pic. It’s a million times better than what I had, so that’s made a major amount of work into a much smaller job.

Tommo and the Hood :)

Wing Repairs

I’ve still had enough of doing the truck roof for now, so decided it was time to make some space in the roof of the garage for the front end. After pulling down the rear of the truck and putting it all back up again in a different place I had enough space to get it all up there apart from the hood which was too big. That’s in the shed for now so it’s on with the wings and front end metal. After looking at it all for a bit I decided I was going to make a new core support and chop out what was there but I’ll make a start on the wings first.

Truck in the Roof

There were a few creases in the drivers side one, and the front edge had a bad fold in it.Apart from that it was in pretty good condition. I welded some washers to the creases and slide hammered them out a bit as I couldn’t get behind to pop them back out. I then spent a good few hours trying to sort out the flat area of the wing but it was stretched and needed shrinking. After a lot of time messing about, I came to the conclusion that I can’t shrink metal to save my life. I’d had enough, so drew a rough square with a marker and chopped it out with the grinder. I cut out a quick replacement and set about welding it in and ended up with a result in a lot less time than I’d spent trying to shrink it. I didn’t want to warp it trying to seam it, so it needs some more work next weekend to join all the tacks together.

Wing Patch

Head Off for a Look

I’ve been planning the engine rebuild for the truck for a while now and needed to pull a head off and see if I had a tired old smoker or a half decent base for the turbo motor. It had been raining all day here, so I did some more work on the door gaps and hoped the weather would improve. It had stopped raining when I went in to get a cup of tea, so when I came back out I pulled off the hood and set about pulling one of the heads off. It all came apart easily and just as I was lifting the head off it started to rain again with the bare metal hood outside. By the time I realised it was raining it was soaked, so I left it out there as it wasnt going to get any wetter and carried on.

One Head Off

I was pleased to still be able to see the factory cross hatch on the cylinder walls, and the carbon lip at the end of the cylinder was almost non existent. This is good news as the pistons I’d bought on impulse from ebay were stock bore sized and I was worried I wouldn’t be able to use them. I took a few pics and popped the head back on for now. I also thought I’d need a new throttle body to fit the LS1 manifold as it had a fly-by-wire one on there, but after checking I found the truck one bolted straight up. It’ll need the outlet moving on the water pump and the idler moved to get it on there properly, but it’ll be worth it not to have the hideous truck manifold.

Cylinder Walls

And Now….. Frankenroof

I’ve been spending plenty of time working on getting the roof dent free and it’s getting there slowly. Very slowly. I decided I wasn’t happy with the roof chop, so just to give myself more work I cut the drivers side rear window quarter and door frame back off and put it all back on so that it lined up properly. This turned out to be a lot of hard work due to it being all over the place and it was so far out on the door frame I ended up using the slide hammer to pull it into line. I’ve been trying to teach myself panel beating as I work on the truck, so rather than hide it all with filler, I spent ages getting it smooth in metal. I’m pretty happy with where I got to with it, and have started to move along the roof join filling it in as I go.

Re-Chop Yer Top

When I get bored with planishing the roof, I pick a random piece and do a repair to keep me from going crazy. I cut out a big dent in the cab back and patched that, and today I decided to do the door edge where it was rotten. It’s also pin holed along the bottom edge so I may cut the lot off and do the whole edge. The patch was an easy one to do, and the only problem I had was my auto darkening welding mask going flat so I had to use my old one and couldnt see to weld properly. I got it tacked in position anyway and the mask is on the window sill to get a charge when we get some sun.

Door Patch

Frankenhood

The ’55 was still out getting it’s gearbox built so I made the most of the space and did some more work on the hood. It had oilcanned where it got run over, and despite my best efforts I wasnt happy with how the repairs to the damage on the front edge came out. I spent a few hours getting the curve at the top front edge right, then cut out the really bad sections with a narrow cutting disk so that I could reshape them before welding them back in.

Frankenhood Corner

The corner was really bad, and I ended up filing the edges down so that I could stretch the dent out to somewhere near it’s original shape. Working with tiny tacks at a time to try and stop it distorting was hard work, and looks ugly. Once it’s all ground out it should look OK tho. I also tacked the cross brace back in to hold it in shape, and with a load more hammering it popped back the right way on the top and stayed there. It needs a fair bit more work to smooth it down, but it’s getting there. I ran out of time as I didnt want to rush it with the welds, so it’s back on the truck out of the way for now.

Patchwork